Showing posts with label diy ring. Show all posts

Monday, August 25, 2014

Outfit with my fashion DIY ring inspried by...?


Hello my friends out there! 
Today a new outfit from the "Puglia archive", warm, sun and flavor of my sea ... and a very casual look by gipsy influence, but always with my personal touch with the DIY ring inspired by... 
guess who? 
Stay tuned for the tutorial!
A big hug and thank you for always being there and for your warmth.


Buongiorno amici!
Oggi un nuovo outfit dall'archivio Puglia, il caldo il sole ed il sapore del mio mare... ed un look molto casual dal sapore gipsy, ma sempre con il mio tocco personale l'anello DIY inspirato a... chi indovina?
Presto il tutorial
Un grandissimo abbraccio e sempre grazie di esserci e del vostro calore.


Follow on Bloglovin

Wednesday, July 16, 2014

DIY ring inspired by Dior!

DIY, DIY ring, DIY Dior, Dior, themorasmoothie, blogger, diyblog, diy blogger, fashion diy, fashionblog, fashionblogger, tutorial ring, tutorial anello, anello Dior, diy veloce, jewellery, diy jewellery, diyproject, craft, crafts, diycraft

How about creating together a new Fashion DIY? 
Really quick and easy to make, and in most inspired by Dior
Time: 3 min ... maybe even less ^ _ * 
Essential: ring band (this is from H&M), large pearl, cover-pearl and hot glue. 
Tutorial: I got the pearl I  pasted the cover-pearl and then I glued this to the base, and  et voilà, here's your fashion ring, what do you think about? 
Who wanna make it? 
A big kiss and the next post 
P.S. stay connected and follow me on social-network too, soon many new.


Che ne dite di creare insieme un nuovo Fashion DIY?
Veramente veloce e semplice ed in più inspirato a Dior 
Tempo: 3 min... forse anche meno ^_*
Necessario: anello a fascia (questo è di H&M), perla grande, copriperla e colla a caldo.
Tutorial: ho preso la perla, vi ho incollato il copriperla e poi ho incollato questo alla base, et voilà il gioco e fatto, che ve ne pare?
Chi lo fa?
Un bacione grande ed al prossimo post
P.S. rimanette connessi anche sui social, presto tante novità


Follow on Bloglovin

Thursday, April 10, 2014

Ring CHANEL? Let's make the DIY

DIY, ring, Chanel, doityourself, diyblog, diyblogger, diyjewelry, recycling, fashionblog, fashionblogger, diyblogger, diyproject, diycraft

Hi there! 
Today a new DIY, a ring inspired by CHANEL. 
I saw this ring on the finger of the models during the CHANELring summer 2014 fashion show, 
I fell in love with it and decided to create my own DIY, also using recycled stuff, but now let's go to the tutorial. 
TIME: 10 min 
ESSENTIAL: cork cap, utility knife, aluminium film for food, ring base, adhesive pearls, glue and hot glue. 
TUTORIAL: I first cut the cork cap in half, then I created a cube which I then covered with aluminium foil blocking it with a bit of glue. I then covered 5 sides of my cube with of the adhesive pearls, and finally I glued the free side with hot glue to the base of the ring. 
What do you say, isn't easy and cute? ... I can't wait to wear it! 
A big kiss and the next post


Ciao!
Oggi un nuovo DIY, l'anello ispirato a CHANEL.
Avevo visto quest'anello al dito delle modelle durante la sfilata CHANEL primavera estate 2014, me ne sono innamorata ed ho deciso di creare un mio DIY, usando anche del materiale di riciclo, ma ora passiamo subito al tutorial.
TEMPO: 10 min
NECESSARIO: tappo di sughero, taglierino, pellicola di alluminio per alimenti, base anello, perle adesive, colla e colla a caldo.
TUTORIAL: ho prima tagliato il tappo a metà, poi ho creato un cubo che ho poi ricoperto con la pellicola di alluminio bloccandola con un pò di colla. Ho poi ricoperto 5 lati del mio cubo con le perle adesive, ed infine il lato libero l'ho incollato con della colla a caldo alla base dell'anello.
Che ne dite, non è semplice e carino?...non vedo l'ora di indossarlo!
Un bacione grande ed al prossimo post

Follow on Bloglovin

Friday, April 4, 2014

Spring outfit with my DIY!

outfit, fashionblog italia, fashionblogger, fashionblog, look, look spring, zanellato, postina bag, diy, diy blog, bershka

Good Morning my friends! Ready for the weekend? 
Today a new outfit for an afternoon very casual and relaxed, a little bit of color and could not miss one of my DIY... the ring, and soon the tutorial really very easy and quick... following the fringed trend ^ _ ^ 
A big kiss and see you soon! 

Buongiorno! Pronti per il week-end?
Oggi un nuovo outfit molto casual per un pomeriggio rilassato ed un pò di colore e non poteva mancare un mio DIY... l'anello, e presto il tutorial veramente molto semplice e veloce...in linea con la tendenza frange ^_^
Un bacione grande e a presto!


Follow on Bloglovin

Wednesday, April 2, 2014

Cool DIY ring inspired by Delfina Delettrez!

diyblog, diycraft, diyproject, diyring, jewelry, diyjewelry, diy delfina delettrez, geox, delfina delettrez, fashionblog, fashionblogger

Hello everyone! 
Today a new DIY, the ring you saw here inspired by Delfina Delettrez. 
As soon as I saw it I fell in love and could not try to make a DIY and I wanna tell you that is very easy and fast, and the effect very cool, what do you think about? 
Time: 3 minutes 
Essential: a large pearl (found here), ring base, glue, wooden pearl and a swarovski. 
Tutorial: helping with pliers I bent the end of the ring, then I applied a bit of glue and I put on the one side the large pearl and on the other the one in wood and with the glue to cover the hole a swarovski. 
The ring is ready to be worn, it's amazing, isn't it? 
A big kiss and soon.


Buongiorno a tutti!
Oggi un nuovo DIY, l'anello che avete visto qui ispirato a Delfina Delettrez.
Appena l'ho visto me ne sono innamorata e non potevo che cercare di fare un DIY e vi dirò è molto semplice e veloce, e l'effetto molto carino, voi cosa ne pensate?
Tempo: 3 minuti
Necessario: Perla grande (la trovate qui), base anello, colla, perla in legno ed uno swarovski.
Tutorial: aiutandomi con delle pinze ho piegato i finali dell'anello, poi ho applicato un pò di colla ed ho inserito da una parte la perla grande e dall'altra la perla in legno ed incollato sul buco lo swarovski.
L'anello è pronto per essere indossato, non è bellissimo?
Un bacione e a prestissimo.


Follow on Bloglovin

Sunday, January 12, 2014

DIY ring with leather and Swarovski!

diy ring, swarovski, tutorial ring, diy fashion, diy blog, fashion blog, fashion blogger

Hi there!
In today's post the tutorial about the ring I was wearing here.
Making it's really super super quick and easy, and in a few time you'll have a super chic ring that will make you shine!
Time: about 5 minutes.
Essential: leather cord, thread of swarovski, golden thread and stapler.
Tutorial: Wrap the leather cord on your finger, creating 2 laps, take the measurement and add about half a centimeter, it will be the thickness of Swarovski.
Then stops the threads with a point of stapler, finally with golden thread wrap the Swarovski and rolled the thread of the same on the double cord, covering the point of the stapler, lock the golden thread and voila  your ring is ready, what about it?
Does it shine?
A big kiss and a big super soon with many new features.


Ciao a tutti!
Nel post di oggi il tutorial dell'anello che indossavo qui.
Farlo è super ma veramente super semplice e veloce, ed in poco tempo avrete un anello super chic che vi farà brillare!
Tempo: circa 5 minuti.
Materiali: cordino in pelle, filo di swarovski, filo oro e pinzatrice.
Tutorial: arrotolate il cordino in pelle sul vostro dito creando 2 giri, prendete la misura ed aggiungete circa mezzo centrimetro, sarà lo spessore degli Swarovski.
Dopo fermate i cordini con un punto di pinzatrice, infine con il filo oro avvolgete gli Swarovski ed arrotolate il filo degli stessi sul cordino doppio, coprendo il punto di pinzatrice, bloccate il filo oro ed voila  il vostro anello è pronto, che ne dite?
Brilla?
Un bacione grande e a super presto con tante novità.


Follow on Bloglovin

Tuesday, October 1, 2013

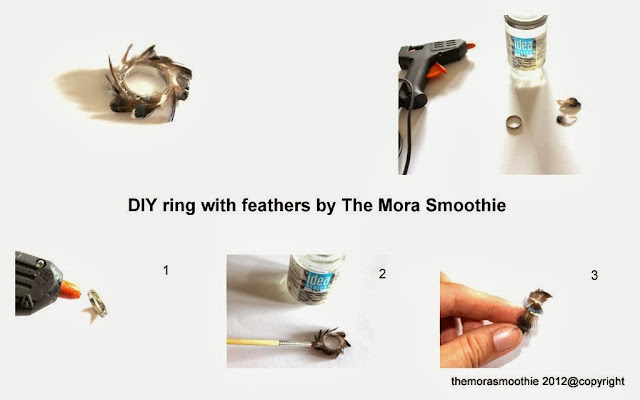
Feathers feathers feathers... check out the DIY!


diy ring, feathers

English tutorial
Feathers feathers feathers
It's a little bit of time that "fashion feathers" is out, and I'm  going crazy for their charm and so I decided to create this ring.
Easy to pair and use.
Needed: I used feathers, hot glue and glazing that generally used for decoupage.
Tutorial: the time to make it happen is very little, to wear it you just have to wait for the vitrification dry.
I got a simple ring, you can also use the classic ring bases that are on the market, I glued it on with hot glue feathers, overlapping them slightly.
Finally I passed on each feather with a brush the glaze.
Et voila DIY is done ... just patience to wait the drying time.
A big kiss and soon a new diy

Il Tutorial in Italiano lo trovate su gowoman.it


Follow on Bloglovin

Sunday, July 21, 2013

Tutorial Diy lace ring "all finger" !


Hi there guys, today I'm posting the tutorial about the ring that I wore here. Well it is super easy to make, I used a piece of lace wholeport, a part of a plastic bottle, to create the basis that I stopped with the double sided tape and then over there I sewed the lace. Then I went through a veil of white glue, I made it dry and then I sprayed all  with the golden spray.
What do you say about? Is not too cute and fashion this ring "all finger"?
A big kiss and soon to


Ciao a tutti, oggi vi posto il tutorial dell' anello che ho indossato qui. Bè farlo è super semplice, ho usato un pezzo di pizzo di wholeport, un pezzo di bottiglia di plastica , per creare la base che ho fermato con del biadesivo e poi sopra vi ho cucito il pizzo. Dopo ho passato un velo di colla vinilica, ho fatto asciugare e poi ho spruzzato il tutto con lo spray oro. 
Che ne dite, non è troppo carino e fashion questo anello a tutto dito? 
Un bacione e a prestissimo


Follow on Bloglovin

Saturday, July 13, 2013

Outfit in the Castle !


Hi there, today a new outfit with a new Diy, the lace ring "all finger".
In this period I'm drivin' crazy about the rings "all finger", but also for the lace ...
you will see ...
Soon the step by step and have a nice weekend
A big kiss to all of you


Ciao a tutti, oggi un nuovo outfit con un nuovo Diy, l' anello in pizzo a tutto dito. 
In questo periodo sono impazzita per gli anelli a tutto dito, ma anche per il pizzo... vedrete...
Presto lo step by step ed intanto buon week end
Un grande bacio a tutti voi


Follow on Bloglovin


Sunday, July 7, 2013

Diy Gucci ring


diy ring


Hi there my friends, today's DIY is about a ring "around the finger" that you have already seen here, the inspiration came to me looking at the Gucci's  sandals and so I started to work immediately. 
I used strips of leather.
As tutor to make it I used a piece of plastic made ​​from a bottle, to follow the pics of how to make it (to be honest I often use this tutor to create rings).
Back to this ring I first applied double-sided tape on the tutor and then I applied 3 pieces of leather  with the part of the back facing me, one a little bit bigger, to make it more rigid I glued the pieces of wire then I applied  over others strips.
To finish with a piece of leather along a little more than twice the length of the ring with double-sided tape I stuck the whole thing, then I got out from the tutor and I did pass the piece of leather even down,  trying to remain under the seam.
What do you think about?
A big kiss and soon.


Ciao a tutti, il Diy di oggi è un anello a tutto dito che avete già visto qui, l' ispirazione mi è venuta guardando i sandali di Gucci e così mi sono messa subito al lavoro. 
Ho usato delle strisce di pelle. 
Come tutor per realizzarlo ho usato un pezzo di plastica ricavato da una bottiglia, a seguire le foto di come farlo (se devo essere sincera uso spesso questo tutor per poter creare degli anelli). 
Tornando a questo anello ho prima applicato del nastro biadesivo sul tutor e poi ho applicato 3 pezzi di pelle con la parte del rovescio rivolta verso di me,uno un po' più grande, dopo per renderlo più rigido ho incollato dei pezzi di fil di ferro e poi sopra ho applicato delle altre strisce. 
Per finire con un pezzo di pelle  lungo un po' più del doppio rispetto alla lunghezza dell' anello con il nastro bi-adesivo ho bloccato il tutto, poi l' ho tolto dal tutor ed ho fatto passare il pezzo di pelle anche sotto, cercando di far rimanere sotto la giuntura. 
Che ne dite? 
Un bacione e a presto.


Follow on Bloglovin