Showing posts with label diy jewelry. Show all posts

Monday, May 19, 2014

Outfit with my feather DIY Necklace!

outfit, look, moda , DIY, themorasmoothie, fashion, fashionblog, fashionblogger, diybog, diyblogger, necklace, diy necklace, diyproject, diycraft, craft, handmade, blogger, tutorial


Hi there! 
The shooting of  today I happened by chance, during my wanderings we found this place that has inspired us a lot and we could not resist to take pics. 
Very convenient and easy with jeans and a white t-shirt, all enlivened by my DIY necklace, the tutorial can be found here
Do you like it? 
A big kiss


Buongiorno a tutti!
L'outfit di oggi è stato scattato per caso, durante il mio girovagare abbiamo trovato questo posto che ci ha ispirato molto e non potevamo resistere a scattare delle foto.
Molto comodo e semplice, con jeans e t-shirt bianca, il tutto ravvivato dalla mia collana DIY, il tutorial lo trovate qui.
Vi piace?
Un bacio grande


Follow on Bloglovin

Wednesday, April 2, 2014

Cool DIY ring inspired by Delfina Delettrez!

diyblog, diycraft, diyproject, diyring, jewelry, diyjewelry, diy delfina delettrez, geox, delfina delettrez, fashionblog, fashionblogger

Hello everyone! 
Today a new DIY, the ring you saw here inspired by Delfina Delettrez. 
As soon as I saw it I fell in love and could not try to make a DIY and I wanna tell you that is very easy and fast, and the effect very cool, what do you think about? 
Time: 3 minutes 
Essential: a large pearl (found here), ring base, glue, wooden pearl and a swarovski. 
Tutorial: helping with pliers I bent the end of the ring, then I applied a bit of glue and I put on the one side the large pearl and on the other the one in wood and with the glue to cover the hole a swarovski. 
The ring is ready to be worn, it's amazing, isn't it? 
A big kiss and soon.


Buongiorno a tutti!
Oggi un nuovo DIY, l'anello che avete visto qui ispirato a Delfina Delettrez.
Appena l'ho visto me ne sono innamorata e non potevo che cercare di fare un DIY e vi dirò è molto semplice e veloce, e l'effetto molto carino, voi cosa ne pensate?
Tempo: 3 minuti
Necessario: Perla grande (la trovate qui), base anello, colla, perla in legno ed uno swarovski.
Tutorial: aiutandomi con delle pinze ho piegato i finali dell'anello, poi ho applicato un pò di colla ed ho inserito da una parte la perla grande e dall'altra la perla in legno ed incollato sul buco lo swarovski.
L'anello è pronto per essere indossato, non è bellissimo?
Un bacione e a prestissimo.


Follow on Bloglovin

Friday, March 21, 2014

DIY earrings inspired by Dolce & Gabbana!

dolce e gabbana, fashionblog, fashionblogger, diy blog, diyblogger, diy fashion,


Hello everyone! 
Ready for the first Spring weekend? What about to create with these amazing earrings inspired by Dolce & Gabbana to celebrate it? 
Time required: 15 minutes per earring. 
Essential: coins (I used one of those belt odalisque from here), golden thread, glue, circles, hooks for earrings, wire cutters and pliers, and tutors. 
Tutorial: With the help of a plastic box (I used the one of chocolate eggs) I created the first circle, then I used a cup for the second, I put the two coins and then with the circles I applied the three coins on the bigger circle and I got a bit of glue to stopped. 
Finally, with a bit of glue, I applied the hook for earrings. 
What do you think about? 
A great big kiss


Buongiorno a tutti!
Pronti per il primo fine settimana di primavera? Che ne dite di creare con me questi bellissimi orecchini ispirati a Dolce e Gabbana per festeggiarla?
Tempo necessario: 15 min per orecchino.
Necessario: monetine (io ho usato quelle di una cintura da odalisca avanzatemi di qui), filo oro, colla, cerchietti, ganci per orecchini, tronchesi e pinze, e dei tutor.
Tutorial: Con l'aiuto di un contenitore (ho usato quello degli ovetti Kinder) ho creato il primo cerchio, poi ho usato una tazzina per il secondo, ho inserito le due monete e poi con i cerchietti ho applicato le tre monete sul cerchio più grande ed ho messo un pò di colla per bloccarle.
Infine con un pò di colla ho applicato il gancio per orecchini.
Che ne dite? 
Un bacio grande grande


Follow on Bloglovin

Tuesday, November 5, 2013

DIY ring inspired by Vita Fede!

diy fashion, DIY, tutorial, diy blog, diy blogger


Hi there!
Here I'm again  with a new DIY.
Do you know the rings with studs of Vita Fede? I had already made the DIY of the bracelets,  you can  finfd here and here, I'm in love with these jewels for their simplicity, but with their rock soul.
Going back to our tutorial, time to realize it is really very little, more or less 5 minutes?!
ESSENTIAL:
1) ring base, I used the one of Wholeport,
2) 2-tipped studs with screw, can be found on ebay, or in some haberdashery, really easy to find,
3) hot glue,
4) pliers.
TUTORIAL:
I bent the tips of the ring helping with the pliers and then with a little hot glue I applied the studs.
Easy, fast and with cool effect, don't u?
A big kiss and  next post


Ciao a tutti!
Eccomi con un nuovo DIY.
Avete presente gli anelli con le borchie di Vita Fede? Avevo già fatto il DIY dei bracciali, li trovate qui e qui, io sono innamorata di questi gioielli della loro semplicità, ma con l' anima rock.
Tornando al nostro tutorial il tempo necessario è veramente pochissimo, diciamo 5 minuti?!
MATERIALE:
1) base anello, io ho usato quella di Wholeport,
2) 2 borchie a punta con vite, le trovate su ebay, o in alcune mercerie, ormai sono facili da reperire,
3) colla a caldo,
4) pinza.
TUTORIAL:
Ho piegato le punte dell' anello aiutandomi con la pinza e poi con un pò di colla a caldo ho applicato le borchie.
Semplice, veloce e d' effetto, che ne dite?

Un bacione ed al prossimo post


Follow on Bloglovin

Wednesday, October 23, 2013

Outfit on an empty ferry...!

diy fashion, fashion blog, fashion blogger, diy blog


Hi there my friends, today a new outfit ...
Now here the weather is crazy, one day with short sleeves and one with jacket with ... the middle seasons ...
These pics were taken during a move by ferry, to speed up, the sky over the lake was really surreal and then be in an empty ferry is priceless and so got on the camera were born these pics of ordinary madness, in which I wore the bracelet that you find here.
Kisses Kisses


Ciao amici, oggi un nuovo outfit...
Ormai qui il tempo è impazzito, un giorno a mezze maniche ed uno con il giubbotto... le mezze stagioni...
Queste foto sono state scattate durante uno spostamento in traghetto, per velocizzare i tempi, il cielo sul lago era veramente surreale e poi trovarsi in un traghetto vuoto non ha prezzo e così inforcata la macchina fotografica sono nate queste foto di ordinaria follia, in cui indossavo il bracciale che trovate qui.
Baci baci

I was wearing:
T-SHIRT: Stradivarius
BAG: Louis Vuitton
BRACELET: DIY
JEANS: H&M
www.themorasmoothie.com


Follow on Bloglovin


Tuesday, October 22, 2013

DIY multicolor bracelet! By @themorasmoothie

diy fashion, crafts, diy bracelet,.


Hello, the today's DIY is a multicolor bracelet that you have already seen here.
The idea came to me seeing the threads for Kids, to understand those of scoubidou.
The time required to make it so about 5 minutes.
Materials:
8 multicolor threads of about 18 cm,
a multiple closure,
silver thread and pliers.
Tutorial:
I cut the threads to length, I put in the silver threads that I stopped at the closure by both the sides, and so for all colors.
Easy, quick and with very low cost materials, what do you think about?


Ciao, il DIY di oggi è un bracciale multicolor che avete già visto qui.
L' idea mi è venuta vedendo i fili per bambini, per intenderci quelli degli scubidù.
Il tempo necessario per farlo circa 5 minuti.
Materiale: 
8 fili multicolor di circa 18 cm, 
una chiusura multipla, 
filo argento e pinze.
Tutorial:
Ho tagliato i fili a misura, vi ho inserito il filo argento che ho fermato alla chiusura da entrambe le parti, e così per tutti i colori.
Facile, veloce e con materiali da pochissimi soldi, che ve ne pare?


Follow on Bloglovin


Wednesday, October 16, 2013

DIY with pearls very very Hepburn

diy fashion, diy bracelet, jewelry, fai da te bracciale, fashion


The pearls, this fascinating material, an accessory always perfect and very elegant, what say ...
With these pearls, got from Wholeport and leather,  I created this DIY, a bracelet that I hope you'll enjoy it.

Tutorial:
1 step
I got 2 different sizes of beads, I put them in the tack.
2 step
making a hook I put them on a chain, first the bigger and then the smaller, alternating.
3 step
with some hooks, from an other chain, I joined the leather and the chain of pearls, and I stopped all with a seam.
4 step
with others hooks I created the closure as they were loops.

A big kiss and see U next DIY, always with me themorasmoothie


Le perle, questo affascinante materiale, un accessorio sempre perfetto e molto elegante che dire...
Con queste perle, prese da Wholeport e della pelle, ho creato questo DIY, un bracciale che spero vi piaccia.

Tutorial:
1 step
ho preso delle perle di 2 differenti misure, le ho inserite nel chiodino.
2 step
facendo un gancio le ho inserite ad una catena, prima le grandi e poi le piccole alternandole.
3 step
con dei ganci, di un' altra catena, ho unito la pelle e la catena di  perle, ed ho fermato con una cucitura.
4 step
con degli altri ganci ho creato la chiusura come se fossero dei passanti.

Un bacione ed al prossimo DIY, sempre con me themorasmoothie


Follow on Bloglovin

Wednesday, September 25, 2013

DIY necklace with feathers ! By @themorasmoothie

necklace, fashion, diy fashion blog


Hi everyone, how are you?
Today I'm posting the DIY's necklace that you have seen here, to create I used it 3 feathers, golden and black pearls and black silk thread.
How did I make?
I made a knot with the thread on the feather, then I put the pearls and I cut the piece of feather.
I made the same thing for all the 3 feathers and then I joined them stringing any pearls, then with the silk thread I created a braid and I applied the closure and the pendant with feathers, what do you think about?
Have a nice day and soon ... kisses and kisses!


Ciao a tutti, come state? 
Oggi vi posto il DIY della collana che avete visto qui, per crearla ho usato 3 piume, delle perle oro e delle perle nere e del filo di seta nero. 
Come ho fatto? 
Ho fatto un nodino con il filo sulla piuma, poi ho infilato le perline ed ho tagliato il pezzo di piuma.
Ho fatto la stessa cosa per tutte e 3 le piume e poi le ho unite infilando delle perline, poi con il filo di seta ho creato una treccia ed ho applicato la chiusura ed il ciondolo con le piume, che ne dite? 
Buona giornata a voi e a prestissimo...baci baci!


Follow on Bloglovin


Wednesday, September 4, 2013

DIY bracelet eye of sea!

diy fashion, diybracelet, jewerly, tutorial

Hi, the today's DIY is a bracelet that you have already seen here, in the tutorial version there is a more strip of Swarovski around the pearl.
Tutorial: from a cap of a chips tube I cut an ellipse then on this, with hot glue, I applied the Swarovski crystals and a turquoise pearl, then on the 2 sides I created 2 holes, with a sharp fork, to enter the rings and the chain, then I applied the closure and the bracelet is ready, what about?
See u soon


Ciao il diy di oggi è un bracciale che avete già visto qui, nella versione del tutorial c'è una striscia di Swarovski in più intorno alla perla.
Tutorial: da un tappo di un tubo di patatine ho tagliato un' ellisse poi su di questa, con della colla a caldo, ho applicato gli Swarovski ed una perla turchese, poi ai 2 lati ho creato 2 buchi, con una forchettina appuntita, per inserire gli anellini e la catena , poi ho applicato la chiusura e il bracciale è pronto, che ne dite?
A prestissimo


Follow on Bloglovin

Sunday, August 18, 2013

Easy & Cool DIY earrings !

diy fashion, diy blog, fashion, do it your self


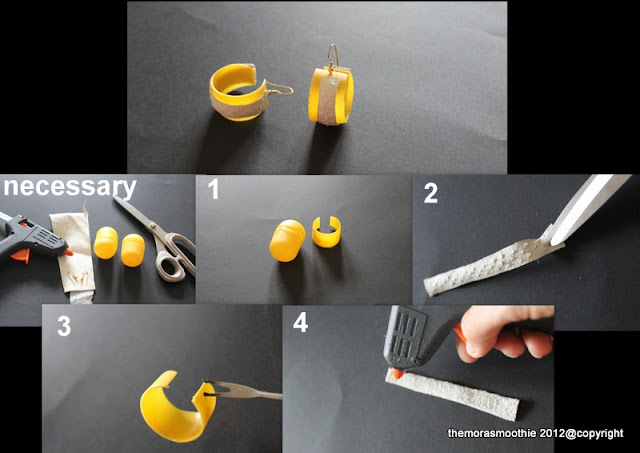
Hello my friends, today's post is about earrings made ​​with leather and with the packaging of the Kinder's surprises ... so recycling
Step by step:
I cut the plastic with scissors, then I applied with hot glue strips of leather previously carved (I created with the tips of scissors any triangle cuts to recreate the snake effect), then I punctured the plastic and I inserted the hook.
First I wanted to paint the plastic, but I like the yellow effect  it as it was.
 what do you think about?

A big kiss


Ciao miei cari, il post di oggi sono degli orecchini fatti con pelle e con la confezione delle sorprese della Kinder...riciclosooo.
Step by step:
Ho tagliato la plastica con delle forbici, poi vi ho applicato con colla a caldo delle strisce di pelle precedentemente intagliate( ho creato con la punta delle forbici dei tagli a triangolo un po' a ricreare l' effetto serpente), poi ho bucato la plastica ed ho inserito il gancio.
Inizialmente avrei voluto dipingere la plastica, ma l' effetto giallo mi è piaciuto così com'era, che ne dite?

Un bacione


Follow on Bloglovin

Tuesday, August 13, 2013

My DIY black necklace !

craft, diy, diy blog, diy blogger


Hello my dears, today a new diy, a black necklace with pendant.
Tutorial:
I got cotton in black silk, thread of silver balls around which I twisted the black thread, then I created this flower blocking all with the thread. Again I applied with the silver thread the three black pearls, then with the black thread I created a braid, I inserted the silver stick and I have applied the pendant and closure. What do you think about?
A big kiss and see u soon...


Ciao miei cari, oggi un nuovo diy, una collana nera con ciondolo. 
Tutorial: 
ho preso del cotone in seta nera, del filo a palline argento intorno al quale ho attorcigliato il filo nero, poi ho creato questo fiore bloccando il tutto con il filo. Dopo ho applicato con il filo argento le tre perle nere, poi con il filo nero ho creato una treccia, ho inserito il bastoncino argento e vi ho applicato il ciondolo e la chiusura. Che ne dite?
Un bacione e a presto...


Follow on Bloglovin