Sunday, September 29, 2013

Tutorial DIY dress inspired by Emporio Armani

diy dress, diy blog

Today is out on The Mora Smoothie a new Diy, you already saw here.
To create it I was inspired by the collection S / S 2013 Emporio Armani.
I know It is a summer dress, but I think it is very nice to be able to use at any time, for an evening and with the right accessories can be very versatile ... elegant or easy.
Tutorial: I used Wholeport's fabric and a tank top with sequins.
How did I make? I cut a rounded triangle from both fabrics, (I've refined and I made ​​the cut sleeve, as you can see from the pics). I sewed a triangle and the other I joined to this (forehand against backhandstraight). Dress is done!
Very fast but with fashion impact. To wear it I used the camisole as if it were a skirt, what do you think about?
Kisses and the next post


Oggi su The Mora Smoothie un nuovo Diy, lo avete già visto qui
Per crearlo mi sono ispirata alla collezione S/S 2013 di Emporio Armani. 
Si è un vestito estivo, ma secondo me è molto carino da poter usare in qualsiasi periodo per una serata e con gli accessori giusti può essere molto versatile...elegante o easy.
Tutorial: ho usato dei tessuti di Wholeport ed una canotta con pailettes.
Come ho fatto? Ho tagliato da entrambi i tessuti un triangolo stondato,(li ho rifiniti ed ho fatto il taglio manica, come potete vedere dalle immagini). Un triangolo l'ho cucito e l'altro l'ho unito a questo ( dritto contro rovescio). Il vestito è fatto!
Molto veloce ma d'effetto. Per indossarlo ho usato la canotta come se fosse una gonna, che ne dite?
Bacioni ed al prossimo post

Photo of the Fashion Show by vogue.it


Follow on Bloglovin

Thursday, September 26, 2013

Red Passion outfit!

fashion, diy blog


Hi there, ready for a gallery of photos?
New outfit with make up in red, as the mesh and accessories made ​​from natural materials, what do you say about?
What is the DIY? ... have you guessed it?
Soon the step by step
Kisses Kisses and have a nice day


Ciao, pronti per una carrellata di foto?
Nuovo outfit con make up in rosso, come la maglia, e accessori in materiali naturali, che ne dite?
Qual'è il DIY?...avete indovinato?
Presto lo step by step
Baci baci e buona giornata


Follow on Bloglovin


Wednesday, September 25, 2013

DIY necklace with feathers ! By @themorasmoothie

necklace, fashion, diy fashion blog


Hi everyone, how are you?
Today I'm posting the DIY's necklace that you have seen here, to create I used it 3 feathers, golden and black pearls and black silk thread.
How did I make?
I made a knot with the thread on the feather, then I put the pearls and I cut the piece of feather.
I made the same thing for all the 3 feathers and then I joined them stringing any pearls, then with the silk thread I created a braid and I applied the closure and the pendant with feathers, what do you think about?
Have a nice day and soon ... kisses and kisses!


Ciao a tutti, come state? 
Oggi vi posto il DIY della collana che avete visto qui, per crearla ho usato 3 piume, delle perle oro e delle perle nere e del filo di seta nero. 
Come ho fatto? 
Ho fatto un nodino con il filo sulla piuma, poi ho infilato le perline ed ho tagliato il pezzo di piuma.
Ho fatto la stessa cosa per tutte e 3 le piume e poi le ho unite infilando delle perline, poi con il filo di seta ho creato una treccia ed ho applicato la chiusura ed il ciondolo con le piume, che ne dite? 
Buona giornata a voi e a prestissimo...baci baci!


Follow on Bloglovin


Tuesday, September 24, 2013

HipHop & Fashion DIY!

street style, fashion , fashionblogger

Hi there, here I'm again, after a pause a little forced ... but this is a different story. 
Today an outfit where the main actor is my new DIY necklace, very eclectic and adaptable to various abbinamente and for this outfit I decided to make it a lot of street style, what do you think about?
A big kiss and stay always connected...


Ciao a tutti, eccomi di nuovo qui, dopo una pausa un po' forzata...ma questa è un' altra storia. 
Oggi un outfit dove il pezzo principale è la mia nuova collana DIY, molto eclettica ed adattabile a vari abbinamenti, per questo outfit ho deciso di renderla molto street style, che ne dite?
Un bacio grande e rimanete sempre collegati...


I was wearing:
T-SHIRT: Calliope
SHORT: Stradivarius
NECKLACE: My DIY


Follow on Bloglovin

Tuesday, September 10, 2013

Intervista: The Vintage Style Man @leonardochiti !

Foto: Nice talking about #vintage with @leonardodeuda at #vrbanfestival @newseventicomo ...#interview


Ciao a tutti, domenica sono stata al Vrban EcoFestival di Verona dove 
ho avuto il piacere di conoscere Leonardo Chiti fondatore del brand Deuda | Vintage and Events
Più che un' intervista è stata una chiacchierata veramente piacevole con un Vintage Style Man.

Follow on Bloglovin

Interview: The Vintage Style Man @leonardochiti !

Foto: Nice talking about #vintage with @leonardodeuda at #vrbanfestival @newseventicomo ...#interview

Hi there, Sunday I went to Vrban EcoFestival in Verona.
I had the pleasure to meet  Leonardo Chiti founder of the brand Deuda | Vintage and Events
More than an interview was a really nice tlaking with a Vintage Style Man


Follow on Bloglovin

Sunday, September 8, 2013

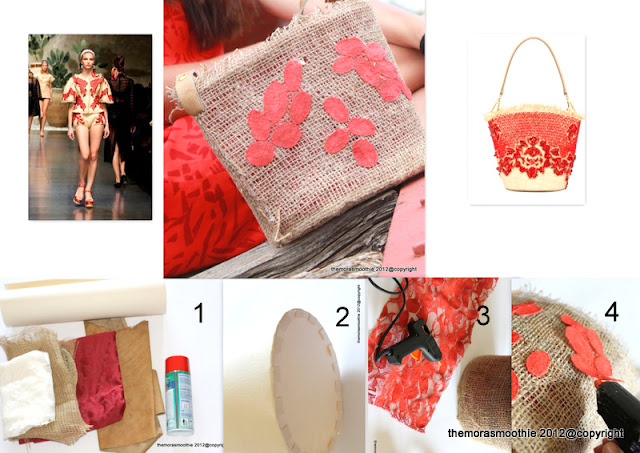
Crazy for jute, DIY bag inspired by Dolce & Gabbana !

diy, blogger, fashionblog, fashionblogger, dolce&gabbana, D&G, bag D&G

Hi there, the today's DIY is a bag made ​​of jute inspired by the fashion show SS 2013 Dolce & Gabbana.
Tutorial: First I cut a rectangle from the "strong for bags" and then from one sideI created a lot of teeth that I used to block the base, a semicircle always of "strong for bags", the lateral I stopped with the hot glue.
Then I covered all inside and outside  with red fabric, using hot glue and then to external I applied the jute fabric. On jute fabric I spent the glue diluted with water, and I left to dry.
In the meantime I colored with the red spray the lace of  Wholeport, that I cut and applied with hot glue. I created the handles with leather and I stucked to the bag with studs.
What do you think about?
kisses Kisses


Ciao a tutti, il DIY di oggi è una borsa in iuta ispirata alla sfilata SS 2013 di Dolce e Gabbana. 
Tutorial: ho prima tagliato un rettangolo dal "rigidino" per borse e poi da una parte ho creato tanti dentini che mi sono serviti per bloccare la base, un semicerchio sempre di "rigidino", il laterale l'ho bloccato con della colla a caldo.
Poi ho rivestito il tutto dentro e fuori con del tessuto rosso, usando la colla a caldo e poi all' esterno ho applicato il tessuto in iuta. Sul tessuto in juta ho passato della colla vinilica diluita con acqua, e l' ho lasciata asciugare. 
Nel frattempo ho colorato con lo spray rosso il pizzo di Whoelport, che ho poi tagliato ed applicato con colla a caldo. Ho creato i manici con della pelle e li ho bloccati alla borsa con delle borchie. 
Che ne dite?
Baci baci


Follow on Bloglovin


Thursday, September 5, 2013

Outfit with DIY dress inspired by Armani!


Hi there, today I'm posting  the outfits that I wore my new DIY dress, guess from who I was inspired by to make it?
Do you think it's difficult to make it? Well you are in the wrong way,  it's really easy, do you want to know how I did?
Keep following me and I will post soon the step by step.
A big kiss and thank you for always being there!
Dress: Diy
Bag: Diy inspired by Roberto Cavalli


Ciao, oggi vi posto l' outfit in cui ho indossato il mio nuovo vestito diy, indovinte a chi mi sono ispirata per farlo?
Pensate che sia difficile? No non siete sulla giusta strada, farlo è stato veramente semplice, volete sapere come ho fatto?
Continuate a seguirmi e presto posterò lo step by step.
Un bacione grande e sempre grazie di esserci!
PS: ...c'è un trucco...guardate bene la gonna!

I was wearing:
DRESS: My DIY
BAG: My DIY inspired by Roberto Cavalli here


Follow on Bloglovin

Wednesday, September 4, 2013

DIY bracelet eye of sea!

diy fashion, diybracelet, jewerly, tutorial

Hi, the today's DIY is a bracelet that you have already seen here, in the tutorial version there is a more strip of Swarovski around the pearl.
Tutorial: from a cap of a chips tube I cut an ellipse then on this, with hot glue, I applied the Swarovski crystals and a turquoise pearl, then on the 2 sides I created 2 holes, with a sharp fork, to enter the rings and the chain, then I applied the closure and the bracelet is ready, what about?
See u soon


Ciao il diy di oggi è un bracciale che avete già visto qui, nella versione del tutorial c'è una striscia di Swarovski in più intorno alla perla.
Tutorial: da un tappo di un tubo di patatine ho tagliato un' ellisse poi su di questa, con della colla a caldo, ho applicato gli Swarovski ed una perla turchese, poi ai 2 lati ho creato 2 buchi, con una forchettina appuntita, per inserire gli anellini e la catena , poi ho applicato la chiusura e il bracciale è pronto, che ne dite?
A prestissimo


Follow on Bloglovin

Tuesday, September 3, 2013

A Train to the Fashion...! By @themorasmoothie

diy fashion, diycraft, fashionblogger


Hi there!
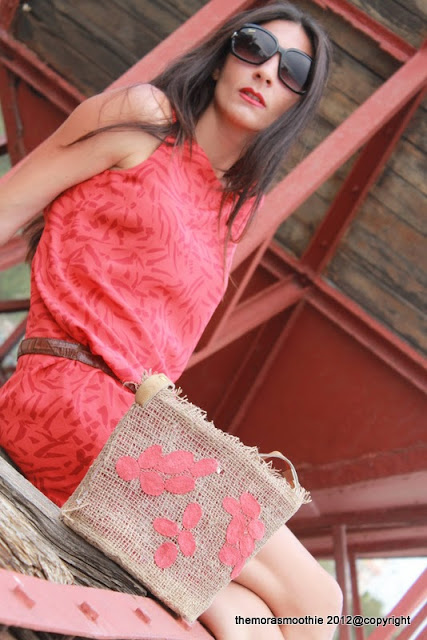
The today's protagonist is red passion ... and my new DIY jute bag inspired by Dolce&Gabbana.
Getting around we saw this train, my red dress is perfectly matched to environment, could not miss the  opportunity to play close to the old cars, I hope you enjoy the pics and soon the step by step of the bag.
A big kiss and to soon.


Ciao!
Il potagonista di oggi è il rosso passione... e la mia nuova borsa Diy in juta ispirata a Dolce e Gabbana.
Girovagando abbiamo visto il treno, il mio vestito rosso si abbinava alla perfezione all' ambiente non potevamo perdere l' occasione di giocare vicino a dei vecchi vagoni, spero vi piacciano le foto e presto lo step by step della borsa.
Un bacione e a prestissimo.

I was wearing:
BAG: My DIY
SUNGLASSES: Gucci


Follow on Bloglovin

Sunday, September 1, 2013

Nice & Cool DIY Turban! By @themorasmoothie

fashion, diy project, diy fashion

Hi guys, today's Diy is a turban, you've already seen in this post. It's so easy to make, just get any silk, satin or silk fabric or simply a very soft fabric.
Tutorial: from fabric cut a strip of as your head circumference and height of about 23 cm, and then another strip that you'll sewing in the middle of the first as shown in the pic
Keeping clear in this last strip about 8 cm I sewed the rest and so I formed the turban, but of course did not stop here. (combining the two in front with a small curl).
As you can see in the pic I pulled in the holes vacated this sort of trunk and I created the pattern on the front and then I stopped it sewing, et voila the turban's ready!
Kisses Kisses Kisses


Ciao ragazzi, il Diy di oggi è un turbante, che avete già visto in questo post. Farlo è molto semplice, basta procurarsi della seta, o del raso in seta o semplicemente un tessuto molto  morbido.
Tutorial: dal tessuto tagliate una striscia di quanto la vostra circonferenza della testa ed alta circa 23 cm, e poi un' altra striscia che cucirete al centro della prima come da figura.
Lasciando liberi su quest' ultima striscia circa 8 cm ho cucito il resto ed ho formato così il turbante, ma ovviamente non è finito qui. (unendo i due davanti con una piccola arricciatura).
Come vedete dalla figura ho tirato in dentro dai buchi lasciati liberi questa specie di proboscide ed ho creato il motivo sul davanti e poi l' ho fermato cucendolo, et voilà il turbante e pronto!

Baci baci baci


Follow on Bloglovin