Wednesday, October 31, 2012

Raining and raining again...on my outfit


Hi everyone, today I'm posting the outfit of few days ago when I wore my new bag, ops not so new  I made ​​some time ago, but I 've worn once (I didn't take pics ), and I forgot to post the step by step ... I'm a little bit forgetful, but I'm trying to retrieve the pics of the bag and now I'm leaving you with this outfit. See you soon kisses kisses


Ciao a tutti, oggi vi voglio postare l'  outfit di qualche giorno fà in cui ho indossato la mia nuova borsa, ops nuova non tanto l' avevo fatta qualche tempo fà, ma l' ho indossata una sola volta( non ho fatto le foto), e mi sono dimenticata di postare lo step by step...sono un pò smemorina, ma cerco di recuperare le foto della borsa ed intanto vi lascio con questo outfit. A presto baci baci


Follow on Bloglovin

Tuesday, October 30, 2012

Diy ring super star...

anello diy super star


Hi, today I'm posting the step by step of the ring star. This idea came to me by chance, I was eating the chips in the tube and I thought I could use the cover, and here's an idea born just by chance, I had this stone-like amber and the game has done. So you need: the plastic cover, golden wire, stone, hot glue, easy ring, and length of chain (I've seen lots of rings with chain type also those by Mawi).
Need to cut the cover as a circle of the desired size, make a little hole, stop the stone with the wire and then the chain with hot glue, simple and true effect, I can assure you that it made ​​a great impression  my diy ring.


Ciao, oggi vi posto lo step by step dell' anello star. L' idea mi è venuta per caso, stavo mangiando le patatine in tubo ed ho pensato il coperchio potrei usarlo, ed ecco l'idea nata proprio per caso, avevo questa pietra simil ambra ed il gioco è fatto. Quindi come occorrente serve: coperchio di plastica, fil di ferro dorato, pietra, colla a caldo, fedina, e pezzo di catena (ne ho visti tanti di anelli con la catena tipo anche quelli di Mawi).
Serve tagliare il coperchio a cerchio della misura desiderata, fare un buchino, fermare la pietra con il fil di ferro e poi la catena con colla a caldo, semplice e di vero effetto, posso garantirvi che ha fatto un figurone il mio anello.


Follow on Bloglovin


Monday, October 29, 2012

The star ring...in a raining day


Hello everyone, and have a nice week!
Today I'm posting the outfit worn yesterday, the weather was mild for a while and gave me the opportunity to take these pics, where the real star was the ring. I told you that in these days I'm a bit attached to the rings, this is the first created, also using recycled stuff, keep following me and soon the step by step. Hugs and kisses and thanks always to be there, I'd love to meet you all and really be able to thank you personally ... would be nice too


Ciao a tutti, e buon inizio di settimana!
Oggi vi posto l' outfit indossato ieri, il tempo è stato per un pò clemente e mi ha dato l' opportunità di scattare queste foto, dove il vero protagonista era l' anello. Ve lo avevo detto che in questi giorni mi sono un pò fissata per gli anelli, questo è il primo creato, usando anche materiale di riciclo, continuate a seguirmi e presto lo step by step. Baci e abbracci e sempre grazie di esserci, vorrei tanto conoscervi tutti e potervi veramente ringraziare personalmente...sarebbe troppo bello


Follow on Bloglovin


Friday, October 26, 2012

My week-end Diy Necklace inspired by DIOR


Hi, for this week-end here's the step by step about the diy necklace inspired by Dior ... I was abble to set up the pics! To create you need: felt, foam, dropper mouse in 2 colors, wire, a bead, decorative beads and glue.
I cut from the felt the drops, over I glued the foam and covered with felt, at the match I glued the dropper mouse, then the beads and finally I assembled the pieces and stopped with a bit of wire, I created a button with pink pearl and buttonhole  with the cords of mouse, cute doesn't it? Kisses kisses and have a nice  weekend ... see yeh very soon!


Ciao, per il week-end vi lascio  lo step by step della collana ispirata a Dior...sono riuscita a sistemare le foto! Per realizzarla servono: pannolenci, gommapiuma, cordina di topo di 2 colori, fil di ferro, una perlina, perline decorative e colla.
Ho tagliato dal pannolenci le gocce, sopra vi ho incollato la gommapiuma e ricoperte con pannolenci, all'unione ho incollato la cordina di topo, poi le perline ed infine ho assemblato i pezzi e fermato con un pò di fil di ferro, ho  creato un bottone con perla rosa e l' asola con le cordine di topo, carina vero? Baci baci e buon week-end...a prestissimo!


Follow on Bloglovin


Thursday, October 25, 2012

Afternoon on the lake by Dior... new diy necklace inspired by Dior


Hello, today I'm posting the outfit  I worn to spend an afternoon on the lake. I enjoy these days that are still hot .. hope it'll go on. I worn my new necklace inspired by Dior ... In thi period  I've rediscovered the pink color  that in the past I was a little hard to wear, you know, as it says it's the color of the child girl, for me it seems like a little piggy, however tomorrow I hope to be able to post  the step by step of the necklace ... I still have to download and set up the pics, I hope to do it soon
Ps: In this period I'm obsessed with the necklaces, but I have a couple of ideas about rings that I'm looking forward to creating and posting. Shhhh. A big kiss to all and thanks for following me ... let me hear your voice with comments, gives me pleasure


Ciao, oggi vi posto l' outfit indossato per trascorrere un pomeriggio sul lago. Per mia gioia in questi giorni qui c'è ancora caldo..speriamo continui. Ho indossato la mia nuova collana ispirata a Dior...In questo periodo ho riscoperto il rosa come colore che prima facevo un pò fatica ad indossare non sò anche se si dice che sia il colore delle bambine a me ha sempre un pò dato di porcellino, comunque spero di riuscire a postare domani lo step by step della collana...devo ancora scaricare e sistemare le foto, spero di riuscirci presto
Ps: In questo periodo mi sono fissata con le collane, però ho un paio di idee per degli anelli che non vedo l' ora di realizzare e postare. Shhhh . Un bacio grandissimo a tutti e grazie di seguirmi... fatemi sentire la vostra voce con un commento mi fà piacere


Follow on Bloglovin


Wednesday, October 24, 2012

Inspiring feathers... new diy necklace


Hello everybody, did you  like the necklace with feathers?
Yes? Today I'm  posting the step by step, maybe is the easier and quick to make of all my crafts.

I bought trimmings with feathers and beads, I superimposed to make it more substantial and I sewn it, then I sewn the chain and in it I put the brown tail of mouse  and of course at the end a closure, easy, quick, but with great effect.


Buongiorno a tutti,vi è piaciuta la collana con le piume?
Si? Oggi vi posto lo step by step, forse è la più semplice e sbrigativa di tutte le creazioni fatte sino ad ora. Ho comprato della passamaneria con piume e perline, l' ho sovrapposta per renderla più corposa e l'ho cucita, poi ho cucito la catena ed in essa ho inserito la codina di topo marrone ed ovviamente alla fine una chiusura, semplice, veloce , ma di grande effetto.


Follow on Bloglovin


Tuesday, October 23, 2012

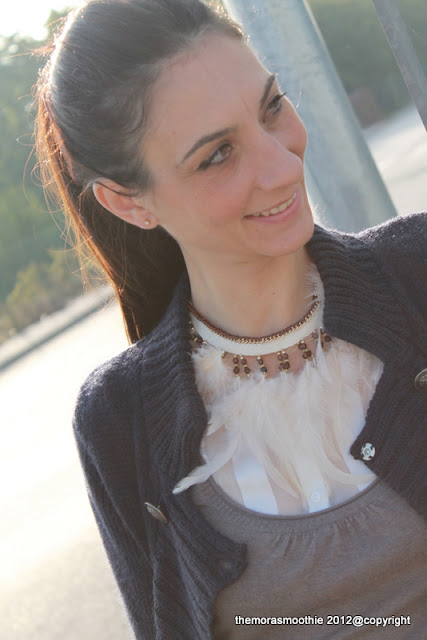
Outfit with...feathers

outfit con...piume


Hello, today I'm  posting the outfit of a few days ago where I worn a new necklace made with feathers, soon the step by step. For a ride in an autumn day I worn to use maxi cardigan Zara, Bershka jeans and sweater Camaieu with light sleeves  and of course my new necklace. Enjoy The Mora Smoothie

 Ciao, oggi vi post l' outfit di qualche giorno fa in cui ho indossato la nuova collana fatta con le piume, presto lo step by step. Per un giro in una giornata autunnale ho deciso di indossare maxi cardigan Zara, jeans Bershka e maglioncino Camaieu con maniche leggere ed ovviamente la mia nuova collana. Enjoy The mora Smoothie


Follow on Bloglovin


Monday, October 22, 2012

Diy infinity necklace


Hi, have a nice week! Do you remember the necklace worn here? I forgot to post the step by step, is really easy and fast, you just need to have a piece of leather (even an old jacket) and a pair of scissors. As I already said this is not my invention, I apologize to the author but I can not find the link from which I was inspired, if any of you knew I'd be happy to be able to mention. Back to us just get a piece of leather and create many pieces, see pic type infinity symbol, and then stick them into each other. Finally for joint is better to get a bit of glue, or you can get a chain or a rope made ​​from the same leather. What do you think about? It's beautiful and easy?


Ciao, buon inizio di settimana! Vi ricordate la collana indossata qui? Tra le varie cose mi ero dimenticata di postarvi lo step by step, è veramente semplice e veloce, basta avere un pezzo di pelle (anche di un vecchio giubbotto) ed un paio di forbici. Come vi avevo già detto non è una mia invenzione, chiedo venia all' autrice ma non trovo più il link da cui mi sono ispirata, se qualcuno di voi lo sapesse sarei felice di poterlo menzionare.  Tornando a noi basta prendere un pezzo di pelle e creare tanti pezzi, vedi foto tipo simbolo infinito, e poi incastrarli l'uno nell'altro. Per il finale nell' incastro è meglio metterci un pò di colla, oppure potete mettere una catena od anche un cordino fatto con la stessa pelle. Che ve ne pare? Non è bellissima e semplicissima?


Friday, October 19, 2012

Autumn in Lanvin..my diy necklace


Hi u there! Today I'm posting the outfit of few days ago when I wore the necklace inspired by Lanvin, what about this necklace, I really like it ... I already told you, right? So rich but lends itself to enhance a simple outfit giving it a little refined. Can be "bon ton" with a dress, or defuse a sporty outfit like this, I like it too, and what do you think about?

Buongiorno a tutti! Oggi vi posto l'outfit di qualche giorno fà in cui ho indossato la collana ispirata a Lanvin, che dire questa collana mi piace tantissimo...ve lo avevo già detto, no? Così ricca, ma così semplice si presta ad impreziosire un outfit semplice donandogli quell' aria un pò ricercata. Può essere "bon ton" con un abitino, o sdrammatizzare un outfit sportivo come questo, che dire sarò ripetitiva ma mi piace troppo, e voi cosa ne pensate?


Follow on Bloglovin

Thursday, October 18, 2012

Diy necklace inspired by Lanvin... very cool

collana Lanvin e mio diy


Hi, today back to the crafting, this necklace is a project that I particularly liked. I loved realizing and wearing it. Maybe it's one of my favorite crafts. I saw this Lanvin necklace and I fell in love, and so I tried to make it with the material I had at home to accomplish it.
What you need: tissue with large fabric weave, pearls, 2 size beads(I used a type faceted brown and others golden bar), big sewing thread, foam rubber, contrasting tissue and grosgrain.
Step by step:
I cut the tissue as the measure of the pearls and I sewed them.
I crafted any circles of faceted beads around  joints of pearls that needed to hold the decorations.
From the foam rubber I cut  3 drops and a square which I covered with dark tissue first and then with a  tissue with large fabric weave and then in it I sewed the beads type bar.

I attached all this at the necklace with the help of the circles of beads and circles of chain.
Finally I put the grosgrain.
What do you think about?


Ciao, oggi ritorno alle consuete creazioni, questa collana è un progetto che mi è piaciuto particolarmente sia realizzarlo che indossarla. Forse è tra le mie creazioni preferite. Avevo visto questa collana di Lanvin me ne sono innamorata e così ho provato con il materiale che avevo in casa a realizzarla.
Cosa serve: del tessuto a trama larga, delle perle, perline di 2 misure (io ne ho usato un tipo sfaccettato marrone e un tipo a barretta dorato), filo per cucire grosso, gommapiuna, tessuto in contrasto e gros grain.
Step by step:
Ho tagliato il tessuto della misura delle perle e l' ho cucito ad esse.
Ho creato dei cerchietti di perline sfaccettate intorno a delle giunture di perle che serviranno per bloccare le decorazioni.
Dalla gommapiuma ho ritagliato 3 gocce ed un quadrato che ho poi ricoperto prima con tessuto scuro e poi con quello a trama larga e poi vi ho cucito le perline a bacchetta
Ho attaccato il tutto alla collana con l' aiuto dei cerchietti di perline e cerchi di catenella.
Per finire ho messo il gros grain.
Che ve ne pare?


Follow on Bloglovin


Wednesday, October 17, 2012

How to make a chocolate frozen dessert...Semifreddo al cioccolato

chocolate ice cream cake


Hi there, as I told u days ago this is a time of new, in fact today I'm posting a tutorial about
a chocolate frozen dessert, to make it as professional ice-cream man, but all can be made ​​at home easily and with fun. Follow me and you too can make it happen.
What you need: whipping cream, sugar, chocolate, saccapoche, container for frozen desserts, spatula, blender and imagination.
How to do: put the sour cream in a bowl and add in the sugar, then mounted. Draw out a little of this soure cream, you need it later for decorations, now add the drops of chocolate and started to put the cream into the mold, then add the melted chocolate and cover. Put in the freezer, it takes about 8 hours, remove from freezer and from the container and start the decoration to your liking and then ... it's ready to eat. Easy isn't it?
Ps:
maybe someone will say, but this is a time for ice cream, but I assure you that in my house there must always be.
  Christmas ... for my friends and family is not the same if  there's no my frozen desserts... luckily is quick and easy

Pss: for those who leave close to Verona (IT) in late November I will hold a course on various desserts with "Kitchen & craft"association, for info paola@themorasmoothie.com


Ciao a tutti, come già vi avevo annunciato questo è un periodo di novità, infatti oggi vi postoil tutorial di un semifreddo al cioccolato, la tecnica e la ricetta sono quelle usate dai gelatai professionisti, il tutto però potrà essere realizzato a casa vostra in maniera facile e divertente. Seguitemi ed anche voi potrete realizzarlo.
Cosa vi occorre: panna da montare, zucchero, cioccolato, saccapoche, contenitore per semifreddi, spatola, frullatore e fantasia.
Come fare: mettete la panna in una terrina ed aggiungeteci lo zucchero, poi montate. Da questa panna prelevatene un pò, vi servirà dopo per le decorazioni, ora aggiungete le goccie di cioccolato ed iniziate a mettere la panna nello stampo, poi aggiungete il cioccolato fuso e ricoprite. Mettete in freezer, dopo il tempo necessario, circa 8 ore, toglietelo dal freezer e dal contenitore ed iniziate la decorazione a vostro piacimento e poi...è pronto da gustare. Semplice no?
Ps: magari qualcuno dirà ma questo non è periodo di gelati, ma vi assicuro che a casa mia ci deve essere sempre, e quando arriva qualcuno và a ruba  in tutte le stagioni è proprio una goduria per le papille gustative.
 ...Natale per i miei amici e parenti non è lo stesso se non porto un semifreddo...per fortuna è semplice e veloce

Pss: per chi fosse in zona Verona verso fine novembre terrò un corso sui semifreddi vari con la "Kitchen & craft", per info paola@themorasmoothie.com


Follow on Bloglovin


Tuesday, October 16, 2012

How to do a cool Diy necklace? Come fare una collana cool Diy?

Collana diy con tappi di riciclo


Hi, do you remember this necklace? How do you do to craft it?
Easy enough just to get some caps and cotton. Yes you have understood, just some caps, following the step by step.
Take the caps and cut them with the cutter to the desired size and more or less the same width, so you got the small  wheels, in each of them do pass 2 needles with cotton (as you can see in the pic), in the first left some thread long you will need for the closure and then to the peak of the small wheel tie a knot and go on so until the desired length. Finally tie a knot with the thread left long of the first small wheel. I would say a very successful and creative recycling fashion. See u next time, kisses kisses


Ciao, vi ricordate questa collana? Come fare a realizzarla?
Semplicissimo basta procurarsi un pò di tappi e del cotone. Si avete capito bene dei tappi, di seguito lo step by step.
Prendete dei tappi e tagliateli con il taglierino della misura desiderata e più o meno della stessa larghezza, avrete così ottenuto delle rotelline, in ognuna di esse fate passare 2 aghi con il cotone (come vedete in foto), nel primo lasciate un pò il filo lungo vi servirà per la chiusura, poi  all' apice della rotellina fate un nodo e proseguite così, sino alla lunghezza desiderata. Per finire fate un nodo con il filo lasciato lungo della prima rotellina. Direi un riciclo creativo molto ben riuscito e fashion. Alla prossima, baci baci


Follow on Bloglovin


Monday, October 15, 2012

Outfit with diy necklace inspired by Aurèlie Bidermann


Hello everyone, are you ready for this new week?
Today I'm posting the outfit of yesterday, in which I wore my new diy necklace inspired by Aurèlie Bidermann. Here yesterday was a chilly day, and even if I do not like the cold, I was glad to wear my new Zara coat combined with the necklace, let me know what you think ... I think it was really ok. kisses


Buongiorno a tutti, siete pronti ad un nuovo inizio di settimana?
Oggi vi posto l' outfit di ieri, in cui ho indossato la mia nuova collana diy inspirata ad Aurèlie Bidermann. Qui ieri era una giornata freddina, ed anche se non amo il freddo sono stata contenta di poter aver indossato il mio nuovo cappottino leggero di Zara abbinato alla collana, fatemi sapere cosa ne pensate... secondo me era veramente ok. Baci


Follow on Bloglovin


Sunday, October 14, 2012

Today no diy... review of face cream Rivini Research


Hello everyone, today there are news on the air, because as you can see today's post is different. In fact, below you will find a review of a face cream that I like very much, I collaborate with this company but of course I wanted to tell you about it before testing the product ... and I was really pleased about the texture,speed of absorption and practically with neutral scent. First I would like to emphasize the importance of using a moisturizer every day (even after 20 years, but I would say even before), and apply it always performing a massage (which wasa lifting action).
In detail, this face cream of Rivini Research contains the latest findings in the field of bio cosmetic technologies: plant stem cells, boswellic acids, hyaluronic acid and glycolic acid. What does this mean? This cream has a powerfull action dermo-regenerating and illuminating effect. Anyway back to me I wanna say u  that I've found it's also great for decolletè and around the eyes (which is usually a sore spot and easily irritated by other products). I liked alsoto  test the BB cream effect (if you follow me you can see that I do not like to wear makeup a lot), mixing this cream with my foundation I had the desired effect and that is skin colored but not heavy, and above all breathable, which say I'm satisfied! If I have intrigued I recommend you try it, you find it in the best pharmacy ...


Ciao a tutti, da oggi ci sono novità nell' aria, infatti come potete notare oggi il post è diverso dal solito. Infatti di seguito trovate la recensione di una crema viso che a me piace tantissimo, collaboro con questa azienda ma ovviamente prima di parlarvene ho voluto testare il prodotto...e ne sono rimasta veramente soddisfatta, sia dalla texture, dalla velocità di assorbimento e dalla profumazione praticamente neutra. Per prima cosa vorrei sottolineare l'importanza di usare una crema idratante tutti i giorni ( già dopo i 20 anni, ma io direi anche prima),  e applicarla sempre eseguendo un massaggio (che ha di per sè un' azione lifting). Nel dettaglio questa crema viso della Rivini Research contiene gli ultimi ritrovati nel campo delle bio tecnologie cosmetiche: cellule staminali vegetali, acidi boswellici, acido jaluronico ed acido glicolico. Cosa significa tutto ciò? Questa crema ha una potente azione dermo rigenerante ed illuminante. Comunque tornando a me vorrei dirvi che l' ho trovata ottima anche per decolletè e contorno occhi (che di solito è un tasto dolente e facilmente irritabile da altri prodotti). Mi è piaciuto testare anche l' effetto BB cream ( se già mi seguite potete notare che non mi piace truccarmi molto), miscelando questa crema con il mio fondotinta ho avuto l' effetto desiderato e cioè pelle colorita ma non appesantita e soprattutto traspirante, che dire sono soddisfatta! Se vi ho incuriosito vi consiglio di provarla, la trovate nelle migliori farmacie...


Follow on Bloglovin


Friday, October 12, 2012

Outfit with diy necklace inspired by Muriano Kehiany


Hello, good day to you all!
Today I 'm posting this outfit from a creation, a commitment and more I almost forgot. The pics were taken last weekend (spent on  the sea ... there was still hot .. how nice). I wore the necklace diy inspired by Muriano Kehiany you find here, Zara t-shirt, Bershka jeans ... good vision, see u next always on the same "wave" ...


Ciao, buona giornata a tutti!
Oggi vi posto quest' outfit che tra una creazione, un impegno e altro quasi mi dimenticavo. Le foto sono state scattate lo scorso week- end (passato al mare...c'era ancora caldo..che bello). Indossavo la collana diy ispirata by Muriano Kehiany che trovate qui, t-shirt Zara, jeans Bershka...buona visione, alla prossima sempre sulla stessa "onda"...


Follow on Bloglovin

Thursday, October 11, 2012

Today on The Mora Smoothie... new diy


What I'm going to propose today? As mentioned here, I'm posting the diy necklace by Aurelie Bidermann.
You need:  black double thread, golden thread (always a bit double), a piece of leather and then needled and closer.
Step by step: create with the black thread some braids, to take them even more double I made each strip of 4 thread, then I cut from the piece of leather the two growing semicircles and then pass to step 3, maching all. Army of punching I punctured the leather and then I sewed it all, nice, isn't it?
ps: as black thread you can also use wool, for me that's sound nice.


Cosa vi proporrò oggi? Come anticipato qui, vi posto il diy della collana by Aurèlie Bidermann.
L'occorrente: del filo nero doppio, del filo color oro (sempre un pò doppio), un pezzo di pelle e poi ago filo e chiusura.
Step by step: create con il filo nero delle trecce, per farle venire ancora più doppie ho fatto ciascun lembo di 4 fili, poi ho tagliato dal pezzo di pelle i 2 semicerchi crescenti e poi si passa alla fase 3, unire il tutto. Armata di fustellatrice ho bucato la pelle e poi ho cucito il tutto, carino no?
ps: come filo nero potete anche usare della lana, secondo me dà un effetto molto carino


Follow on Bloglovin