Thursday, January 31, 2013

Diy infinity ring!

diy blog


Here again with a new Diy. A simple glittering ring, to make it I used a double thread of Swarovski, I simply knotted and then  I glued with  jewels glue to a simple base for rings, what do you think about? Will that S. Valentine's Day is approaching? ... "The daimonds are the true friends of a woman" ... wants to be a subliminal message for my man? A big kiss and you soon


Eccomi qui con un nuovo Diy. Un semplicissimo anello luccicante, per farlo ho usato un doppio filo di Swarovski, che ho annodato semplicemente e poi l' ho incollato con colla da bijoux ad una semplice base per anelli, che ne dite? Sarà che S. Valentino si avvicina?..."i diamanti sono i veri amici di una donna"...vuole essere un messaggio subliminale per il mio lui? Un bacione e a prestissimo


Follow on Bloglovin


Tuesday, January 29, 2013

How to wear my DIY necklace!

diy blog


Hello my dear friends, today I'm posting  the outfits worn a few days ago ... with a ray of sunshine. I wore a pair of leather pants, black jacket and in rock'n roll tone my necklace, do you remember it? You can find it here, a kiss

Ciao miei cari, oggi vi posto l' outfit indossato qualche giorno fa...con uno spiraglio di sole. Indossavo un paio di pantaloni di pelle, giacca nera ed in tono rock la mia collana, ve la ricordate? La trovate qui, un bacione 


Follow on Bloglovin


Monday, January 28, 2013

Today Diy necklace with hair clips inspired by Aurèlie Bidermann !

lifestyle blog


What's up today? A new Diy, to make  it for just a few material and 10 minutes of your time, really very easy, but very effective, and to make it I was inspired by this beautiful necklace by Aurèlie Bidermann. What does it need? Hair clips, golden ribbon, double-adhesive tape, golden spray  and  turquoise nail polish. I put the double-adhesive tape on the gloden ribbon, then I put  the hair clips, then I colored it with the spray and after drying I put a little bit of turquoise nail polish on the tips of the hair clips (I'm sorry but the last 2 steps there are no pics) . It's easy, isn't it?


Cosa c'è oggi? Un nuovo Diy, per farlo solo pochi materiale e 10 minuti del vostro tempo, veramente semplice semplice, ma di grande effetto, e per farlo mi sono ispirata a questa bellissima collana di Aurèlie Bidermann. Cosa serve? Dei ferma capelli, del nastro color oro, nastro biadesivo, color oro spray e smalto turchese. Ho messo il biadesivo sul nastro, poi vi ho inserito i fermacapelli, poi con lo spray ho colorato e dopo l' asciugatura ho messo un pò di smalto turchese sulle punte dei fermacapelli (mi dispiace ma degli ultimi 2 passaggi non ci sono le foto). Semplicissimo, no?


Follow on Bloglovin


Friday, January 25, 2013

A cold winter day with my DIY scarf clip !

lifestyle blog


Hi there, today a easy outfit in a very cold winter day, but luckily with a ray of sunshine and guess what I wore to diy? My scarf clip is really useful ... and my hair are safe. The tutorial can be found here. kisses kisses


Ciao, oggi un semplice outfit in una freddissima giornata invernale, ma per fortuna con uno spiraglio di sole ed indovinate cosa ho indossato di diy? Il mio ferma sciarpa è veramente molto utile...e i miei capelli sono salvi. Il tutorial lo trovate qui. Baci baci


Follow on Bloglovin


Thursday, January 24, 2013

Diy fashion bag inspired by Louis Vuitton!

fashion diy


Hello everyone! Here I'm with a new step by step to make by yourself from an old baga new one  inspired by ... Louis Vuitton! The original bag is really beautiful, but how could it not? ...
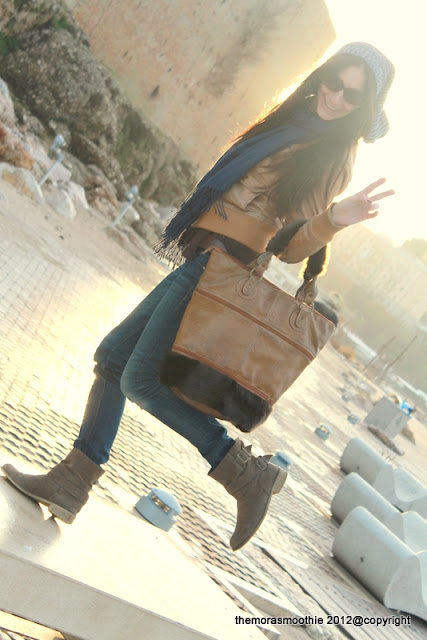
I've worn this outfit. To make it I used an old bag, wool very thin as the one used for this skirt, a piece of leather, and I used hot glue to combine everything. Then I used a closure for bag, but  to decorate it I used a ring for curtains and black beads to decorate it, here I stopped everything with hot glue too. And then I put the handles, do you remember them? The tutorial is here. I'm really satisfied is a really fashion DIY , hope you like it. A very  big kiss


Ciao a tutti, eccomi con un nuovo step by step per crearsi da soli da una vecchia borsa una nuova ispirata a ... Louis Vuitton! La borsa originale è veramente bellissima, ma come non potrebbe?...
L'ho già indossata in questo outfit. Per farla ho usato una vecchia borsa, della lana molto sottile come quella usata per questa gonna, un pezzo di pelle, ed ho usato la colla a caldo per unire il tutto. Poi ho usato una chiusura per borsa, ma per decorarla ho usato un anello per tende e delle perline nere per decorarlo, anche qui ho fermato tutto con colla a caldo. E poi vi ho messo i manici, ve li ricordate? il tutorial è qui. Sono proprio soddisfatta è veramente un diy fashion, spero vi piaccia. Un bacione


Follow on Bloglovin


Tuesday, January 22, 2013

MY new cool DIY necklace!


Hi there, today I'm posting  this brand new diy, to tell the truth I had this necklace that I had broken to push back, but then I said to myself,  could I craft something else? So here is a new DIY necklace, to make it I used a thin  thread silver colored. Kisses and see u soon


Ciao, oggi vi posto questo nuovissimo diy, a dire la verità avevo questa collana che mi si era rotta da reinfilare, ma poi mi sono detta e se creassi qualcos' altro? E così ecco la nuova collana, per reinfilarla ho usato un filo sottile color argento. Bacioni e a presto


Follow on Bloglovin

Monday, January 21, 2013

New outfit with new diy bag inspired by..!


Ready for a new busy  week? Today I'm posting the pics taken yesterday in which I wore my new creation inspired by ...? Soon the step by step ... xxx


Pronti per una nuova settimana? Oggi vi posto le foto fatte ieri in cui indossavo una mia nuova creazione ispirata a...? Presto lo step by step... bacioni


Follow on Bloglovin


Friday, January 18, 2013

My Diy scarf clip!

ferma sciarpa


What's up today on TMS? A scarf clip, yes that's! There are many ways to wear them to stop them, but sometimes, at least for myself, it unrolls and when there is so cold I try to re-stop it fo but I finished to pull my hair ... maybe I'm a landslide, however I created this that solved the problem. With a simple piece of leather and Velcro. I glued the velcro to the leather, a part is used to hold the flaps and other gets around the scarf, what do you think about ? And my hair is finally safe. Kisses and kisses and see u soon
Ps: instead of Velcro can also be used  pressures buttons or simple buttons.


Di cosa parla  il  post di oggi? Di un ferma sciarpa, si proprio così. Ci sono tanti modi di indossarle di fermarle, ma alle volte, almeno parlo per me, mi si srotolano e quando c'è tanto freddo cerco di rifermarla per riavvorgermi ma rischio di tirarmi i capelli... forse sono una frana, comunque ho creato questo che mi ha risolto il problema. Con un semplice pezzo di pelle e del velcro. Ho incollato il velcro alla pelle, una parte serve per tenere fermi i lembi e l' altra si mette intorno alla sciarpa, che ne dite? Ed i miei capelli sono finalmente salvi. Baci baci ed al prossimo post

Ps: al posto del velcro si possono usare anche dei bottoni a pressioni o dei semplici bottoni.


Follow on Bloglovin


Thursday, January 17, 2013

Very very cuddly DIY blanket!

Diy coperta morbidosa


Hello, today I don't posting  women's accessories as usual, but I'm posting the Diy about a very  cuddly blanket, of course easy to make, all you need is thread, sewing machine, edge and the play has done. But the best thing about this blanket is that it is very very cuddly, in fact as soon as I saw this fabric I was stroking it ... just to say that me and my baby we 've already tried ... we could no longer get up...


Ciao, oggi non vi posto accessori femminili come di solito, ma vi posto il Diy di una coperta morbidosa, ovviamente facilissima da fare basta avere filo, macchina da cucire, bordino ed il gioco è fatto. Ma la cosa più bella di questa coperta è che è morbidosissima, infatti appena ho visto questo tessuto sono rimasta ad accarezzarlo... è inutile dirvi che io e il mio bambino l' abbiamo già provata... non riuscivamo più ad alzarci


Follow on Bloglovin


Tuesday, January 15, 2013

Diy earrings with sequins!

orecchini fai da te con paillettes


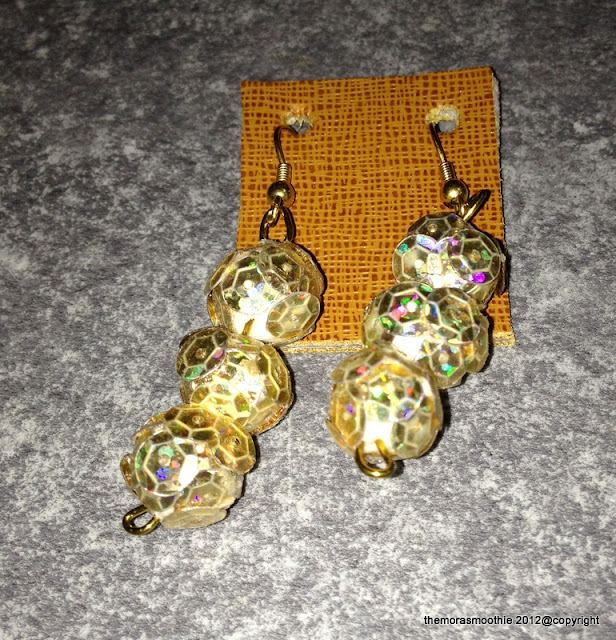
Hi my friends, today I'm posting a very easy pair of earrings made ​​with sequins. On the ball base l (this is made of cotton wool, but this's a different story) I glued sequins, then from the hole I passed the golden thread which I then stopped at a hook for earrings. The earrings are ready to wear, what do you think about?


Ciao, oggi vi posto un paio di orecchini semplicissimi fatti con paillettes. Sulla base a pallina, (questa è fatta con dell' ovatta,ma è un' altra storia) ho incollato le paillettes, poi dal foro vi ho fatto passare del filo dorato che ho poi fermato ad un gancio per orecchini. Gli orecchini sono pronti per essere indossati, che ve ne pare?


Follow on Bloglovin


Monday, January 14, 2013

My cute diy owl bookmark

gufo segnalibro


Hi there, have a nice  week. Today I'm posting  one of the gifts made for Christmas, a cute owl bookmark. To make it  I used two types of lether, one brown and one gold. I cut three shapes for the body, two brown and one golden  and then 2  brown to make the back. On a brown  piece  for the body I made some incisions to give a sense of depth and drain the golden, I made two circles for the eyes and then from other brown leather I made 2 circles slightly smaller still for the eyes.
Then I glued  the first 3 parts, then I glued the 2 backs, and finally I joined the 2 parts so created  just for the head, and here is my little owl. It's cute, isn't it?


Ciao, buon inizio settimana. Oggi vi posto uno dei regali fatti a Natale, un simpatico gufetto segnalibro. Per farlo ho utilizzato 2 tipi di pelle, una marrone ed una color oro. Ho tagliato 3 sagome per il corpo, 2 marroni ed 1 dorata, e poi 2 marroni per fare la parte posteriore. Su un pezzo marrone per il corpo ho fatto delle incisioni per dare un senso di profondità e far fuoriuscire il dorato, ho fatto 2 cerchi per gli occhi e poi da della pelle marrone ho fatto 2 cerchi un pò più piccoli sempre per gli occhi. Dopo ho incollato le prime 3 parti, poi ho incollato i 2 posteriori, ed infine ho unito le 2 parti così create solo nella parte della testa, ed ecco il mio gufetto. Carino?


Follow on Bloglovin

Friday, January 11, 2013

Outfit in Croazia


Hello, today I'm posting pics when I wore the bracelet with sequins, were made during a break from my flash but very nice and enjoyable stay in Kroatia, taking advantage of the nice weather I also walked on the beach. A big kiss to all


Ciao, oggi vi posto le foto in cui ho indossato il bracciale con le paillettes, sono state fatte durante una pausa durante il mio flash ma molto carino e divertente soggiorno in Croazia, approfittando delle belle giornate ho passeggiato anche sulla spiaggia. Un bacione a tutti


Follow on Bloglovin


Thursday, January 10, 2013

Shoes with faux fur


Hello, today I'm posting  the step by step of the shoes with the faux fur. To tell the truth is simply an application you can wear when you want to be more glamour on boots. To make it I cut a piece of fake fur, I glued the velcro double adhesive and then with a piece of leather and a buckle I made a strap to tighten it and hold it on the ankle. Brilliant idea, isn't it?


Ciao, oggi vi posto lo step by step delle scarpe con il pelo. A dir la verità è semplicemente 
un' applicazione che si può indossare quando si vuole un tocco più glamour sui boots. Per farla ho tagliato un pezzo di finta pelliccia, vi ho incollato il velcro biadesivo e poi con un pezzo di pelle ed una fibia ho fatto un cinturino per stringerlo e tenerlo fermo sulla caviglia. Geniale, no? 


Follow on Bloglovin


Wednesday, January 9, 2013

New cool Diy bracelet!

nuovo bracciale


Hi, today we're starting  with a new Diy, a  super cool bracelet, but above fast, easy to make and with cool effect. To make it I used a double sided tape adhesive, stapler, a trimming with sequins and as a base a piece of curing bags left over from other creations ... anything you throw everything can be recycled. 
I got this idea starting right from the trimmings, when I saw it I said to myself is mine, something I have to make it is fine too. I got the strong piece, I pinched, then I put the double-sided tape adhesive inside and out and then I attacked the trimmings, what do you think about? Following the step by step pics, kisses kisses


Ciao, oggi ripartiamo con un nuovo Diy, un bracciale super cool, ma soprattutto veloce facile e     d' effetto. Per realizzarlo ho usato nastro bi-adesivo, pinzatrice, una passamaneria con paillettes e come base un pezzo di indurimento borse avanzato da altre creazioni... nulla si butta tutto si può riciclare. L' idea mi è partita proprio dalla passamaneria, quando l'ho vista mi sono detta è mia, qualcosa devo farla è troppo bella. Ho preso il pezzo rigido, l'ho pinzato, poi ho messo il bi-adesivo sia dentro che fuori e poi vi ho attaccato la passamaneria, che ne dite? A seguire le foto dello step by step, baci baci


Follow on Bloglovin


Tuesday, January 8, 2013

Outfit with my new Diy !


Hi today I'm posting one of the outfit worn during the vacation with one of my new diy, soon  the step by step. Kisses and see you soon


Ciao oggi vi posto uno degli outfit indossato durante le vacanze con uno dei miei nuovi diy, presto lo step by step. Bacioni ed alla prossima puntata


Follow on Bloglovin

Monday, January 7, 2013

DIY old bag renewed with faux fur

the mora smoothie


Hi everyone, today I'm posting the DIY about an old bag renewed  with faux fur. Do you remember? I had already used, you can find  here the outfit. To make it  I simply  used pieces of faux fur and I attached with hot glue, and the play has done ... and so I have a new bag :) Kisses


Ciao a tutti, oggi vi posto il DIY di una vecchia borsa rinnovata con della pelliccia. Ve la ricordate? L'avevo già usata, potete trovare qui l' outfit. Per farla ho usato semplicemente dei pezzi di eco-pelliccia e l'ho attaccata con la colla a caldo, ed il gioco è fatto ... ed io ho una nuova borsa :) Bacioni


Follow on Bloglovin

Saturday, January 5, 2013

"Sound check" and the performance


Hi everyone! Do you remember the pic to wish you a happy new year? Well it was not me who was playing the guitar ... but something similar ... I spent  two beautiful nights in the company of Saverio Amato and his Band version impersonator of Celentano. Too great! What say...  have been really 2 nice days and in good company, follow some pics about "sound check" and during the  performance. A big kiss to all


Ciao a tutti! Vi ricordate la foto per augurarvi un felice anno nuovo? Be non ero io che suonavo la chitarra...ma qualcosa c'entrava...  ho partecipato a 2 serate bellissime in compagnia di Saverio Amato e la sua Band in versione imitatore di Celentano. Troppo Bravo!!! Che dire... sono stati 2 giorni veramente belli ed in bella compagnia, a seguire alcune foto del "sound check"  e alcune dell' esibizione. Un bacione a tutti 


Follow on Bloglovin


Wednesday, January 2, 2013

The Winter sea


Hi everyone, new year new outfit spent to the sea with an old bag carried forward, what do you thin about it? Soon the step by step. Smack


Ciao a tutti, nuovo anno nuovo outfit passato al mare con una vecchia borsa riportata a nuovo, che ne dite? Presto lo step by step. Bacionissimi


Follow on Bloglovin


Tuesday, January 1, 2013

Happy 2013


Happy 2013!
Are you ready for a new roundup of Diy? Stay with me and we will see some beautiful meanwhile greeting 2012 with a small souvenir of Diy that took me and I have made ​​known to you, a special greeting to all of you and Lots of Kisses and thanks again. See you soon


Buon 2013!!!
Siete pronti ad una nuova carrellata di Diy? Rimanete con me e ne vedremo delle belle intanto saluto il 2012 con un piccolo ricordo dei Diy che mi hanno accompagnata e mi hanno fatta conoscere da voi, un augurio speciale a tutti voi e Tantissimi Baci e sempre grazie. A presto


Follow on Bloglovin