Showing posts with label leather. Show all posts

Monday, October 28, 2013

Intervistando Alberto Cisamolo di "Linea Nostra" Scarpe!


Ciao a tutti, il mio post di oggi è l' intervista fatta a Alberto Cisamolo ideatore e creatore di Linea Nostra.
"Tanti anni di passione, solo chi crea può conoscere quel senso di soddisfazione, di gioia assoluta che provo ogni volta che una delle mie calzature indossata mi incontra, con quei piccoli sogni che rendono piena la vita degli altri e quindi il mio lavoro, e ciò che nasce da esso, cosi' entro nelle vostre vite, credendo nell' eleganza e nell' unico e personale linguaggio della bellezza, e con lei mi accompagno."
Prima dell' intervista volevo farvi leggere questa bellissima frase scritta da Alberto che potete trovare nel suo sito, frase profonda e densa di significato che in se racchiude tutto il suo essere di bella persona e veramente genuina.

Follow on Bloglovin

Tuesday, July 30, 2013

Diy bag inspired by Tom Ford !

tutorial bag, craft bag, diy bag, fashion diy

Hi there!
Today I wanna show this Diy about a bag.
To create it I was inspired by Alix of Tom Ford, it is easy to make,  u just need leather, a zipper long enough and needle for the sewing machine for leather. First I cut a piece of leather 50 x 60 cm (for those who follow me already for a while on the blog know that I use recycled leather, waste from businesses or type stores upholsterers).
I folded the piece in two leaving out one part and then apply the zipper, then I cut the round to tuck the arm (to be precise I used a vase with a circular base). I sewed all the edges as seen in the pic and I applied the zipper ... the only entrance to the bag is the zipper, but I assure you that it is very comfortable and roomy! What do you think about?
Hope you like it, a big kiss and keep in touch!


Ciao!
Il Diy di oggi è una borsa.
Per crearla mi sono ispirata alla Alix di Tom Ford, farla è semplice, basta avere della pelle, una cerniera abbastanza lunga ed un ago per pelle per la macchina da cucire. Per prima cosa ho tagliato un pezzo di pelle di 50 x 60 cm ( per chi mi segue già da un pò sul blog sa che uso pelle riciclata, da scarto di aziende o negozi tipo tappezzieri ). 
Ho piegato il pezzo in due lasciando fuori una parte per poi applicarvi la cerniera, poi ho tagliato il tondo per infilare il braccio ( per essere precisa ho usato un vaso a base circolare). Ho cucito tutti i bordi come si vede in foto ed ho applicato la cerniera... l'unico ingresso alla borsa è la cerniera, ma vi assicuro che è molto comoda e capiente! Che ne dite?
Spero vi piaccia un bacione ed al prossimo post.


Follow on Bloglovin

Thursday, June 27, 2013

Outfit with Blue DIY ! By @themorasmoothie


Hi everyone, how are you? New day, new outfit with a new Diy, soon will post you the tutorial, ... but try to guess who and what inspired me?
I leave you with these pics, which I hope you enjoy them, a kiss and soon


Ciao a tutti, come va? Nuovo giorno, nuovo outfit con un nuovo Diy, presto posterò il tutorial,... ma provate ad indovinare a chi e a che cosa mi sono ispirata? 
Vi lascio con queste foto, che spero vi piacciano, un bacione e a prestissimo


Follow on Bloglovin

Tuesday, May 7, 2013

Diy bracelet inspired by Hermès!

diy blog


Hi there, today on The Mora Smoothie  a new Diy inspired by Hermès!
To make this bracelet I used scraps of leather waste (so the form is a little boxy shape having to do the cutout), but you can use any leather and re-create it following the pattern of paper. I cut from a piece of leather  the middle part and an other I created the two sides and then I added the strip where I applied the closure, I used a bit of glue to lock it all better. What do you think about? A big kiss and see you soon


Ciao a tutti, oggi su The Mora Smoothie un nuovo Diy ispirato ad Hermès!
Per realizzare questo bracciale ho utilizzato dei ritagli di pelle di scarto (quindi la mia forma è un pò squadrata dovendosi attenere alla forma del ritaglio), ma voi potete utilizzare della pelle e ricrearlo seguendo gli schemi di carta. Ho tagliato da un pezzo la parte centrale e da un' altro ho creato i due laterali e poi ho inserito la striscia dove ho applicato la chiusura, ho usato un pò di colla per bloccare meglio il tutto. Che ne dite? Un bacione e a presto


Follow on Bloglovin


Thursday, May 2, 2013

Diy pois cover IPad!

cover


Hi there, today on www.themorasmoothie.com a new Diy!
A cover for I pad, but can also be used as a bag.
Tutorial:
With a piece of leather I created the base that I stopped with the stapler, then I applied the tape Wholeport, to give it a touch of fashion. Finally with a long leather cord about 96 cm Endlessleather, and a bolt (which you can find at hardware stores) I created the closure that I stopped using the tape! What do you think about?
A big kiss and see you soon


Ciao a tutti, oggi un nuovo Diy!
Un porta Ipad, ma può anche essere usato come borsa.
Tutorial: 
Con un pezzo di pelle ho creato la base che ho fermato con la pinzatrice, poi ho applicato il nastro adesivo di Wholeport, per dargli un tocco fashion. Infine con un cordino di pelle lungo circa 96 cm di Endlessleather , ed un bullone (che si può trovare nelle ferramenta) ho creato la chiusura che ho fermato con il nastro adesivo! Che ne dite?
Un bacione e a presto


Follow on Bloglovin


Thursday, April 18, 2013

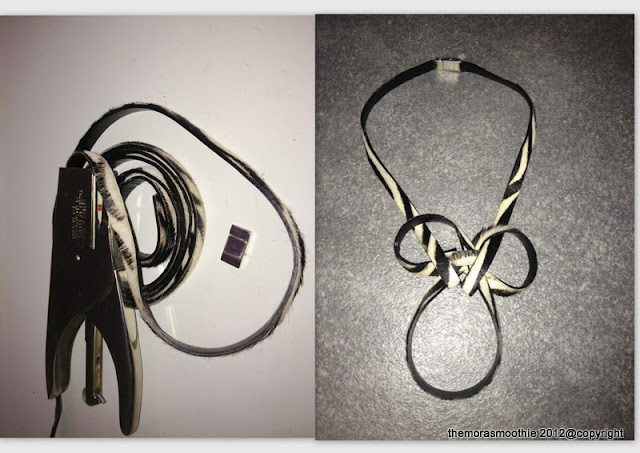
MY new Diy Zebra Necklace... by @themorasmoothie

the mora smoothie


Hi everyone, today I'm posting a new Diy made simply with stapler, and a lanyard stripes can be found on the website of Endlessleather (I recommend these lanyard, they are really beautiful and very easy to work with ... the quality it shows!).
Tutorial: I cut a piece of 65 cm (in the follow  pic n.4 is a technical test, it should just cut to the end of the second circle). I created 2 circles at the beginning and at the end, and I stuck with the stapler, then I twisted the center and I stuck  all with  points of stapler, trying to hide them. Then I cut 2 pieces of 25 cm each one, I have stuck to a circle of those created first, and I created the threads of the necklace to which I applied with glue  tne closure.
New necklace with about 115 cm of cord, closure, and stapler, and the great thing is that the time to make it is about 10 minutes ... what do you want more?! A big kiss and see U next post


Ciao a tutti, oggi vi posto un nuovo Diy fatto semplicemente con pinzatrice, e un cordino zebrato lo trovate sul sito di Endlessleather ( vi consiglio questi cordino, sono veramente belli e molto facili da lavorare...la qualità si vede!). 
Tutorial: ho tagliato un pezzo di 65 cm (nella foto 4 a seguire è una prova tecnica, va proprio tagliato alla fine del secondo cerchio). Ho creato 2 cerchi all'inizio ed alla fine e gli ho bloccati con la pinzatrice, poi ho attorcigliato il centro ed ho bloccato il tutto con dei punti di pinzatrice, cercando di nasconderli. Poi ho tagliato 2 pezzi di 25 cm l'uno gli ho bloccati ognuno ad un cerchio di quelli creati inizialmente ed ho creato i fili della collana a cui ho applicato con la colla la chiusura
Nuova collana con circa 115 cm di cordino, chiusura, e pinzatrice, e la cosa bella è che il tempo necessario per farla è di circa 10 minuti...cosa si può volere di più??! Un bacione ed al prossimo post


Follow on Bloglovin

Tuesday, April 16, 2013

Outfit with my Diy Bag by Alexander Wang!

the mora smoothie


Hello my dear friends, today I'm posting a new outfit ... to tell the truth is about last week when there were miserable rays of the sun... to warm my little bones !
There I wore the bag inspired by Alexander Wang, the tutorial can be found here ... maybe a little presumptuous, forgive me, but I'm really too happy with this bag. 
Kisses


Ciao miei cari, oggi vi posto un nuovo outfit... a dire il vero è di settimana scorsa quando qui ancora c'erano dei miseri raggi di sole...a riscaldare le ossicine!
Indossavo la borsa ispirata ad Alexander Wang, il tutorial lo trovate qui... forse è un pò da presuntuosi, perdonatemi, ma sono veramente troppo soddisfatta di questa borsa. 
Bacioni


Follow on Bloglovin


Thursday, April 11, 2013

This is me and my Diy bracelet!

the mora smoothie


Hi guys, here's a new outfit ... a great desire to nude feet and open air and a sense of freedom ... well this is me.
A big kiss to all of you and see you next post!
Ps: here's the tutorial of the bracelet inspired by Celine!


Ciao ragazzi, nuovo outfit ...tanta voglia di piedi nudi e di aria aperta e senso di libertà...
 bhè questa sono io. 
Un bacione a tutti ed al prossimo post!
Ps: qui trovate il tutorial del bracciale ispirato a Cèline!


Follow on Bloglovin


Tuesday, April 2, 2013

Bag inspired by Alexander Wang

diy fashion


Hello there, here I'm with a new Diy, I was inspired to create it by Alexander Wang. How to make it? Well it's easy, you have to use a lanyard leather soft and very flexible I used to Endlessleather ... and I recommend it, it is a Company I work with and I recommend it for materials and fast delivery, pay attention  on their web-site to get lost among thier items ;-)
Back to the tutorial I cut 10 pieces of rope of to 2 m each one, then I knotted together starting from the center and going forward (the distance between nodes is 5 cm) Then I glued the leather lanyards  with 2 pieces of leather, where I also hook the handle ... always made with the string, how? Well I used 4 threads of about 38 cm and I rolled over the cord and then secure it with the hooks of a chain. This is the basis and also how you can use it, but to have two bags in one I just created a base covering a box with leather ... A bit long to explain but I hope clear ... I think "they" will be my prefer summer bags... kisses kisses


Ciao a tutti, eccomi con un nuovo Diy,per crearla mi sono ispirata ad Alexander Wang. Come farla? Bè è semplicissimo, bisogna usare un cordino di pelle morbido e molto duttile io ho usato quello di Endlessleather... e ve lo consiglio, è un' azienda con cui collaboro e ve la consiglio per materiali e tempi di consegna velocissimi, occhio nel loro sito potreste perdervi tra tutti i cordini ;) 
Tornando al tutorial ho tagliato 10 pezzi di cordino di 2 metri l'uno, poi li ho annodati tra loro iniziando dal centro ed andando avanti (la distanza tra i nodi è di 5 cm) Dopo ho bloccato i cordini incollandoli con 2 pezzi di pelle, dove ho anche agganciato il manico...fatto sempre con il cordino, come? Bè ho usato 4 fili di circa 38 cm ed ho arrotolato il cordino sopra per poi bloccarlo con i ganci di una catena. Questa è la base ed anche come potete usarla, però per avere 2 borse in una ho creato una base, semplicemente rivestendo una scatola con della pelle...
Un pò lungo da spiegare ma spero chiaro...penso che "queste" saranno le mie borse estive per eccellenza...baci baci


Follow on Bloglovin

Friday, March 29, 2013

My Diy bracelet inspired by Céline

the mora smoothie


Hi there, today a new Diy inspired by Céline. Very easy to make, I got a piece of leather about 15 cm x 52 cm, I went to excess in length to be sure. I folded the two pieces with double sided tape and I unlocked them and then I made ​​a knot, then I applied a piece of aluminum for the laundry 2 points that helped me to stop and finish the pieces of leather and also to enter the closing the holes made​​. What do you think about?


Ciao a tutti, oggi un nuovo Diy ispirato a Céline. Molto semplice da fare, ho preso un pezzo di pelle di circa 15 cm x 52 cm, sono andata per eccesso nella lunghezza per essere sicura. Ho piegato i 2 pezzi e con il nastro biadesivo li ho bloccati e poi ho fatto un nodo, dopo  ho applicato  un pezzo di alluminio per parte bucato in 2 punti che mi è servito a bloccare e rifinire i pezzi di pelle ed anche per inserire la chiusura nei buchi fatti. Che ne dite? 


Follow on Bloglovin


Friday, March 8, 2013

Diy earrings double face!

diy blog


Hello everyone, today I'm posting  these earrings made ​​with scraps of leather used for the bracelet inspired by Fendi. Do you remember that I told you that I didn't thrown? Well I made these earrings, very easy. I used the advanced pieces, a piece of leather on which glue it to the back, could be called double face, and then I applied the hook for earrings, easy, cool and quick just like I like it. See you soon
Ps: I created this design, and earrings, but you can do anything you want, and shapes ... pyramidal and more ... space to your imagination


Ciao a tutti, oggi vi posto questi orecchini fatti con gli avanzi di pelle usati per il bracciale ispirato a Fendi. Vi ricordate che vi avevo detto che non li avrei buttati? Bene ho fatto questi orecchini, molto semplici. Ho usato i pezzetti avanzati un pezzo di pelle su cui incollarli per il dietro, potrebbero essere chiamati double face, e poi vi ho applicato il gancio per orecchini, semplici e veloci proprio come piace a me. A presto 
Ps: io ho creato questo disegno,e degli orecchini, ma potete fare qualsiasi cosa, e forme... piramidali ed altro... spazio alla vostra fantasia


Follow on Bloglovin


Monday, January 14, 2013

My cute diy owl bookmark

gufo segnalibro


Hi there, have a nice  week. Today I'm posting  one of the gifts made for Christmas, a cute owl bookmark. To make it  I used two types of lether, one brown and one gold. I cut three shapes for the body, two brown and one golden  and then 2  brown to make the back. On a brown  piece  for the body I made some incisions to give a sense of depth and drain the golden, I made two circles for the eyes and then from other brown leather I made 2 circles slightly smaller still for the eyes.
Then I glued  the first 3 parts, then I glued the 2 backs, and finally I joined the 2 parts so created  just for the head, and here is my little owl. It's cute, isn't it?


Ciao, buon inizio settimana. Oggi vi posto uno dei regali fatti a Natale, un simpatico gufetto segnalibro. Per farlo ho utilizzato 2 tipi di pelle, una marrone ed una color oro. Ho tagliato 3 sagome per il corpo, 2 marroni ed 1 dorata, e poi 2 marroni per fare la parte posteriore. Su un pezzo marrone per il corpo ho fatto delle incisioni per dare un senso di profondità e far fuoriuscire il dorato, ho fatto 2 cerchi per gli occhi e poi da della pelle marrone ho fatto 2 cerchi un pò più piccoli sempre per gli occhi. Dopo ho incollato le prime 3 parti, poi ho incollato i 2 posteriori, ed infine ho unito le 2 parti così create solo nella parte della testa, ed ecco il mio gufetto. Carino?


Follow on Bloglovin

Thursday, January 10, 2013

Shoes with faux fur


Hello, today I'm posting  the step by step of the shoes with the faux fur. To tell the truth is simply an application you can wear when you want to be more glamour on boots. To make it I cut a piece of fake fur, I glued the velcro double adhesive and then with a piece of leather and a buckle I made a strap to tighten it and hold it on the ankle. Brilliant idea, isn't it?


Ciao, oggi vi posto lo step by step delle scarpe con il pelo. A dir la verità è semplicemente 
un' applicazione che si può indossare quando si vuole un tocco più glamour sui boots. Per farla ho tagliato un pezzo di finta pelliccia, vi ho incollato il velcro biadesivo e poi con un pezzo di pelle ed una fibia ho fatto un cinturino per stringerlo e tenerlo fermo sulla caviglia. Geniale, no? 


Follow on Bloglovin


Friday, December 21, 2012

Diy keychain lucky-charm inspired by Prada

come fare portachiavi ispirato a Prada


Today, December 21 ... end of the world ... naaa
Here I'm to posting a new DIY with tutorial and as a dedication to this day I will call it the keychain lucky-charm with kitty inspired by Prada. And now step by step: to make it I usedvarious recycled materials, the packaging of  chocolate Kinder eggs as a base covered with golden leaf, a roll of toilet paper made ​​of a cone for the body which I then covered with a piece of leather, other part of the Kinder egg cut to make head covered with leather stuck on the body and eyes with studs, mustache with cord, and eyes, mouth and legs with pieces o
leather.
 Kisses kisses to all and have a nice endof the world ...


Oggi 21 Dicembre...fine del mondo ...naaa
Io sono qui a postarvi un nuovo DIY corredato da tutorial e come dedica a questo giorno lo chiamerò il portachiavi portafortuna con gattino ispirato a Prada. Ed ora lo step by step: per farlo ho usato vari materiali di riciclo , la confezione delle sorprese Kinder dell' ovetto come base ricoperto con foglio oro, un rotolo di cartaigienica fatto a cono per il corpo che ho poi ricoperto con un pezzo di pelle, altra parte dell' ovetto tagliato per fare la testa ricoperto di pelle ed incastrato sul corpo e poi occhi con borchie, baffi con cordoncino, ed occhi e bocca e zampette con pezzettini di pelle. Baci baci a tutti e buona fine del mondo...


Follow on Bloglovin

Monday, December 10, 2012

Christmas time on my city!


... after a night of snowfall, snow in the city was already dissolved :( ... but the Christmas spirit in Verona you breathe in deeply, the stalls of St. Lucia,  Bauli's trees etc ... In this outfit I wore my diy of Falabella, remember it? no? can be found here.  This version is wrapped up  a little Befana but so warm. A big kiss and have a nice week.


...dopo una serata di nevicata, la neve per la città era già sciolta :(  ... ma l' atmosfera natalizia per Verona si respira a pieni polmoni, tra bancarelle di S. Lucia , alberi della Bauli etc... In questo outfit ho indossato il mio diy della Falabella, ve lo ricordate? no? lo trovate qui. Questo è in versione imbacuccata, un pò Befana ma tanto calda. Un bacione e buon inizio settimana.


Follow on Bloglovin


Wednesday, December 5, 2012

Diy bag inspired by DOLCE & GABBANA


Hi everyone, are you a little perplexed? You are wondering, what does a plastic container for detergents do? Well my madness has no limits, do you want to know what I'll do? Obviously  the Diy about the bag worn here, the inspiration came to me watching the show A / W 2012 Dolce & Gabbana. To make it I used the base of a plastic container of softener  (I need it to make the bag more strong), and then with black leather (sewing it with the machine) I have covered. I put a inside zipper and then the closing for bag. Then  I got to the decoration with a doily for cake cutting the decoration and glue it with glue for leather as decoupage,, and then I attached the chain, what do you think abour?


Ciao a tutti, siete un pò perplessi, vi state chiedendo, ma cosa ci fà un contenitore per detersivi? Bè ecco la mia pazzia non ha limiti, volete sapere cosa ne farò? Ovviamente il Diy della borsa indossata qui, l' ispirazione mi è venuta guardando la sfilata A/I 2012 di Dolce & Gabbana. Per farla ho usato la base di un contenitore di ammorbidente (mi è sevito per dargli rigidità), e poi con la pelle nera (cucendola con la macchina) l'ho rivestita. Vi ho messo una cerniera interna e poi la chiusura per borsa. Sono passata alla decorazione con un centrino per dolci tagliando le decorazioni ed incollandolo con colla per pelle diciamo tipo decoupage,ed infine vi ho attaccato la catena, che ve ne pare?


Follow on Bloglovin


Tuesday, November 20, 2012

My diy necklace with multicolor studs


Hi, today I'm posting a step by step. Do you remember the necklace with colored studs you saw here? To make ti you need to a piece of leather, studs, thread, chain, ribbon and nail polish. I colored the studs with the nail polish and got them dry thoroughly, then on paper I drew the model of the necklace, I reported on the leather and then cut it. With needle and thread I sewed the chain, I applied the studs and then I tied with a knot in the chain a black ribbon. What do you think of my multicolor necklace?
ps: as studs you can apply also the adhesive one or the one with the screw, depends on the tastes and available materials.


Ciao, oggi vi posto uno step by step. Vi ricordate la collana con borchie colorate che avete visto qui? Per realizzarla servono un pezzo di pelle, borchie, filo, catena, nastro e smalti. Ho colorato le borchie con gli smalti e le ho fatte asciugare bene, poi su un foglio ho disegnato il modello della collana,  l' ho poi riportato sulla pelle e l' ho tagliata. Con ago e filo ho cucito la catena, ho applicato le borchie e poi ho legato con un nodo alla catena un nastrino nero. Che ve ne pare della mia collana multicolor?
ps: come borchie potete applicare anche quelle adesive o con la vite, dipende dai gusti e dai materiali a disposizione


Follow on Bloglovin

Thursday, November 15, 2012

My zip diy necklace

diy necklace


Hi there, today I'm posting the step by step about zip necklace you saw here, I apologize in advance if the pics are not exhaustive but I will try to explain in words. On a sheet I designed the model, then I cut 2 pieces of leather on the model, on one I applied a loop where I then inserted the chain, then I twisted the piece of hinge and I glued it and I glued the gros grain too, I then glued the two pieces of leather masking everything. What do you think about?


Ciao a tutti, oggi vi posto lo step by step della collana con cerniera che avete visto qui, in anticipo vi chiedo scusa se le foto non sono esaustive ma cercherò di spiegarmi a parole. Su un foglio mi sono disegnata il modello, poi ho tagliato 2 pezzi di pelle seguendo il modello, su uno ho applicato un' occhiello dove ho poi inserito la catena, poi ho attorcigliato il pezzo di cerniera e l' ho incollato ed ho incollato anche il gros grain, ho poi incollato i 2 pezzi di pelle mascherando il tutto. Che ne dite?


Follow on Bloglovin


Friday, November 2, 2012

Diy glitter Bag inspired by Philipp Plein


Hi there, today I'm posting the tutorial of the diy bag with glitter you have seen here. I tell you in advance that it isn't the best step by step, even if the creations are born with the idea as the songs, as Vasco Rossi says, already with the words, sometimes during the  processing must correct something. (I did not think of having to line, but then it does not seem finished). Now go on with what u need: pieces of leather, lining, bag closure, eyelets with eyelet manual (really cost a few Euros), chain, glitter glue and glitter. I cut the leather of the required size giving a rounded base, then I cut a strip that will be the side, and a piece which is the front, I sewed everything, of course, leaving the front flap free. I did the same for the lining which I then stopped at the bag with hot glue. I applied closure, eyelets and then the glue (which I left to curdle), the glitter and finally I added the chain. To tell the true I have to tell you that the inspiration for this bag came to me looking at the wonderful creations of Philipp Plein


Ciao a tutti, oggi vi posto il tutorial della borsa brillantinata che avete visto qui. In anticipo vi dico che non è uno dei migliori step by step, anche se le creazioni nascono già con l' idea come le canzoni come dice Vasco già con le parole, alle volte durante l' elaborazione bisogna correggere qualcosa. (non pensavo di doverla foderare, ma poi non mi sembra rifinita). Passiamo all' occorrente: pezzi di pelle, fodera, chiusura per borsa, occhielli con occhiellatrice manuale (costa veramente pochi euro), catena, colla per brillantini e brillantini. Ho tagliato la pelle della misura desiderata dando una stondatura, poi ho tagliato una striscia che sarà il laterale, ed un pezzo che è il davanti, ho cucito il tutto, ovviamente lasciando la pattina davanti libera. Ho fatto lo stesso per la fodera che ho poi fermato alla borsa con colla a caldo. Ho applicato chiusura, occhielli e poi la colla (che ho lasciato rapprendere), i brillantini ed infine ho aggiunto la catena. Vi dirò l'ispirazione di questa borsa mi è venuta guardando le creazioni meravigliose di Philipp Plein


Follow on Bloglovin


Monday, October 22, 2012

Diy infinity necklace


Hi, have a nice week! Do you remember the necklace worn here? I forgot to post the step by step, is really easy and fast, you just need to have a piece of leather (even an old jacket) and a pair of scissors. As I already said this is not my invention, I apologize to the author but I can not find the link from which I was inspired, if any of you knew I'd be happy to be able to mention. Back to us just get a piece of leather and create many pieces, see pic type infinity symbol, and then stick them into each other. Finally for joint is better to get a bit of glue, or you can get a chain or a rope made ​​from the same leather. What do you think about? It's beautiful and easy?


Ciao, buon inizio di settimana! Vi ricordate la collana indossata qui? Tra le varie cose mi ero dimenticata di postarvi lo step by step, è veramente semplice e veloce, basta avere un pezzo di pelle (anche di un vecchio giubbotto) ed un paio di forbici. Come vi avevo già detto non è una mia invenzione, chiedo venia all' autrice ma non trovo più il link da cui mi sono ispirata, se qualcuno di voi lo sapesse sarei felice di poterlo menzionare.  Tornando a noi basta prendere un pezzo di pelle e creare tanti pezzi, vedi foto tipo simbolo infinito, e poi incastrarli l'uno nell'altro. Per il finale nell' incastro è meglio metterci un pò di colla, oppure potete mettere una catena od anche un cordino fatto con la stessa pelle. Che ve ne pare? Non è bellissima e semplicissima?